Registered visitors
In this article
Registered visitors are visitors you enter in the backoffice before they arrive. At the tablet they look themselves up instead of typing their details, which keeps the queue at your reception short. Use it for expected visitors, contractors on site for several days, and anyone you want to invite to pre-register.
Switch on registered visitors for a visit type
Registered visitors are enabled per visit type, so start with the visit type your visitor will use.
-
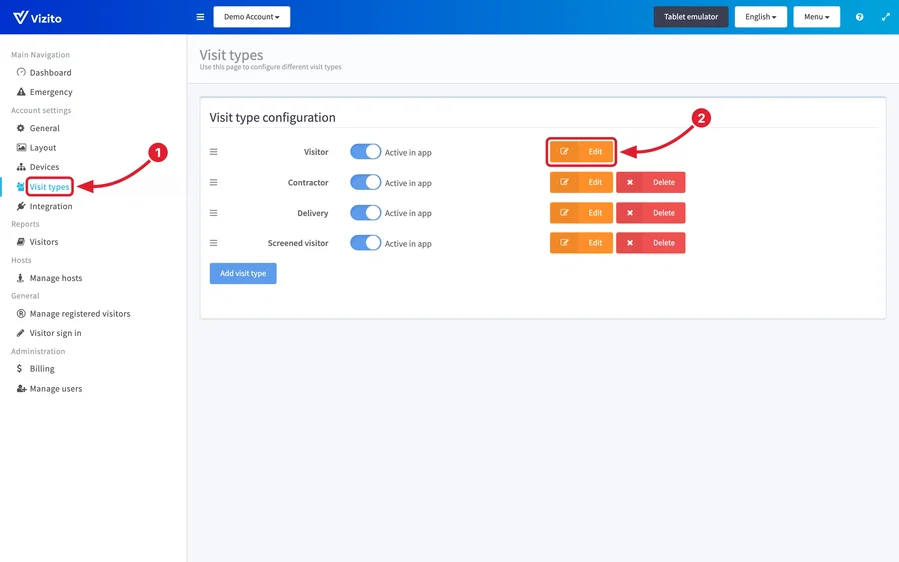
Open the Vizito backoffice and select “Account settings” > “Visit types” in the left menu.
-
Click “Edit” on the visit type you want to configure.
-
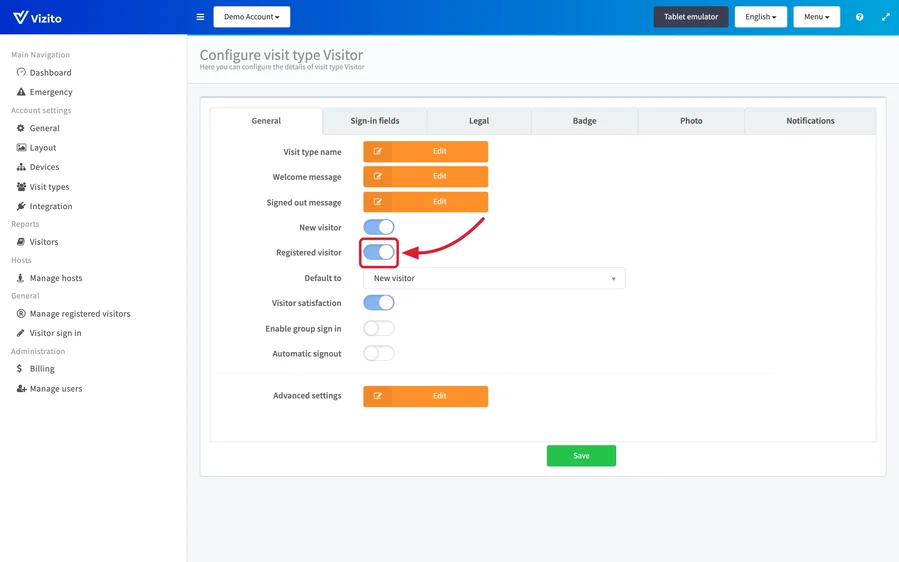
On the “General” tab, switch on “Registered visitor”.
-
Click “Save”.
Add a registered visitor
-
Select “General” > “Manage registered visitors” in the left menu. The “Registered visitors” page lists everyone you have entered so far.
-
Click “Add”. The “Registered visitor details” window opens.
-
Choose the “Visit type” at the top. The fields underneath follow the sign-in fields of that visit type, so which ones you get depends on the visit type you pick. See Sign-in field configuration.
-
Fill in the visitor’s details and set “Visiting on?” if the visit is for a specific day.
-
Click “Save”.
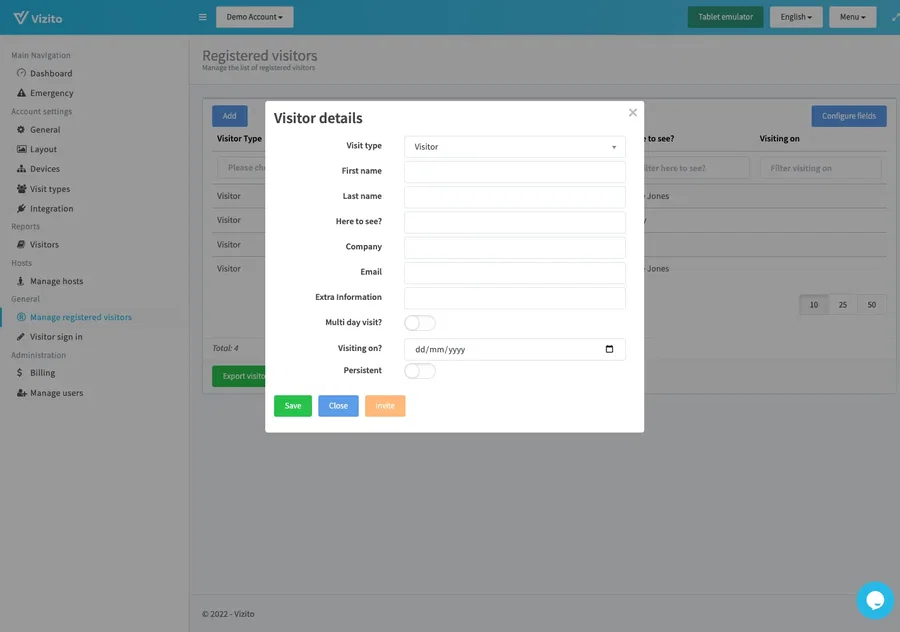
“Invite” saves the visitor and emails them an invitation to complete their own details up front. See Pre-registration.
Decide on which days the visitor can sign in
“Visiting on?” controls when the visitor can be found at the tablet:
- Leave “Visiting on?” empty and the visitor stays available every day.
- Fill in a single date and the visitor is available on that date only.
- Switch on “Multi day visit?”, the toggle directly above it, and “Visiting on?” becomes a “From - To” range that keeps the visitor available on every day between the two dates. Use this for contractors and anyone else who comes back several days in a row.
Keep a visitor when data retention is on
“Persistent”, at the bottom of “Registered visitor details”, excludes a registered visitor from your data retention policy. With it switched on, that visitor is never removed automatically.
Among the built-in roles, only a Local admin or Global admin gets the switch, and it only appears once data retention applies to registered visitors. Under “Account settings” > “General” > “Privacy settings”, switch on “Enable data retention”, switch on “Registered visitors”, and set “Days data is kept”. See Privacy.
Work on the whole list
Four buttons around the list work on the list as a whole:
- “Configure fields”, top right, chooses which columns the list shows.
- “Export” opens the “Export visitors” window, where you choose “Export CSV” or “Export XLSX” to download the list.
- “Import data” adds registered visitors from a CSV file. Choose the visit type, then upload the file: the dialog lists the column headers your file may use and links a sample file to start from. A “Delete existing registered visitors” switch deletes the registered visitors of that visit type as part of the import. Persistent ones stay, unless you also switch on “Delete persistent registered visitors”.
- “Bulk action” applies one action to the rows you tick: “Sign In”, “Send invitations”, “Print badge”, “Print badge via kiosk”, “Download QR codes” and “Delete”. It stays greyed out until you select at least one row.
Who sees which buttons
Your role decides which of these buttons you get:
- A Receptionist, Local admin or Global admin gets all of them.
- An Employee can add, edit, import and invite registered visitors, but cannot export, sign in, print badges or delete. There is no “Export” button, and “Bulk action” only offers “Send invitations”. With a host linked to them, an Employee only sees the registered visitors who come for that host.
- A Security guard does not have “Manage registered visitors” in the menu.
A custom role gets the buttons its privileges allow: “Add, edit, delete, import and invite registered visitors” for everything except “Export” and “Download QR codes”, which need “Export the registered visitor list”. “Persistent” also needs “Manage data retention and anonymise visitors”. See User management and user roles for the built-in roles.
At the tablet
The visitor taps “Sign In”, picks the visit type, taps “Registered visitor” and types the first letters of their name to select themselves from the list. Pre-registration walks through the rest of that flow.