Advanced settings
In this article
Advanced settings hold the parts of Vizito that most accounts never need to touch. They sit in two separate windows: one for settings that apply to your whole location, and one for settings that belong to a single visit type.
Change a setting only when you know what it does. Most of them change how the app behaves for every visitor at once. If anything below is unclear, ask us through the chat at the bottom right of the backoffice before you change it.
Open the account-wide advanced settings
-
Open the Vizito backoffice and select “Account settings” > “General” in the left menu.
-
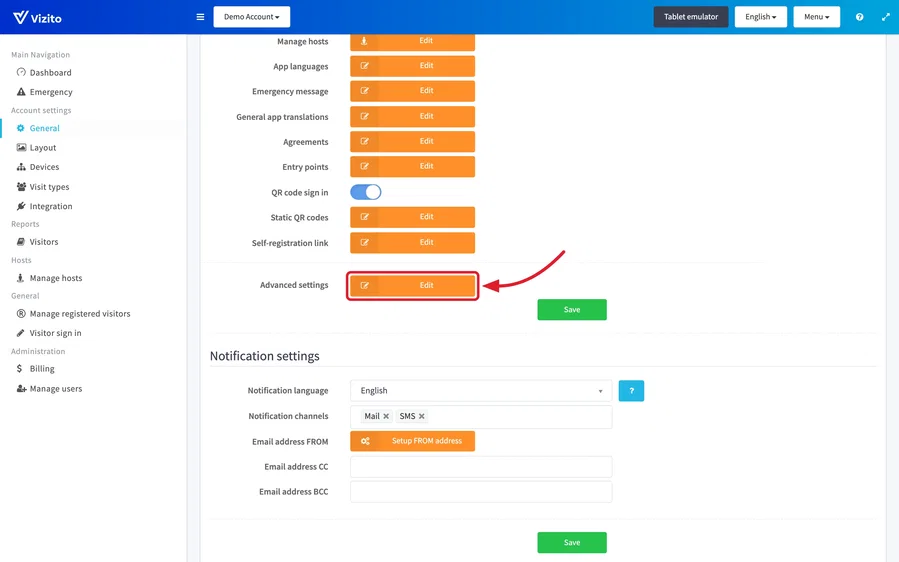
Scroll to the bottom of the “Location settings” section, to the “Advanced settings” row.
-
Click “Edit”.
-
Change what you need and click “Save”.
These settings belong to the location you are working in. In an account with several locations you set them per location, see Manage locations.
Open the advanced settings of a visit type
-
Open the Vizito backoffice and select “Account settings” > “Visit types” in the left menu.
-
Click “Edit” on the visit type you want to change.
-
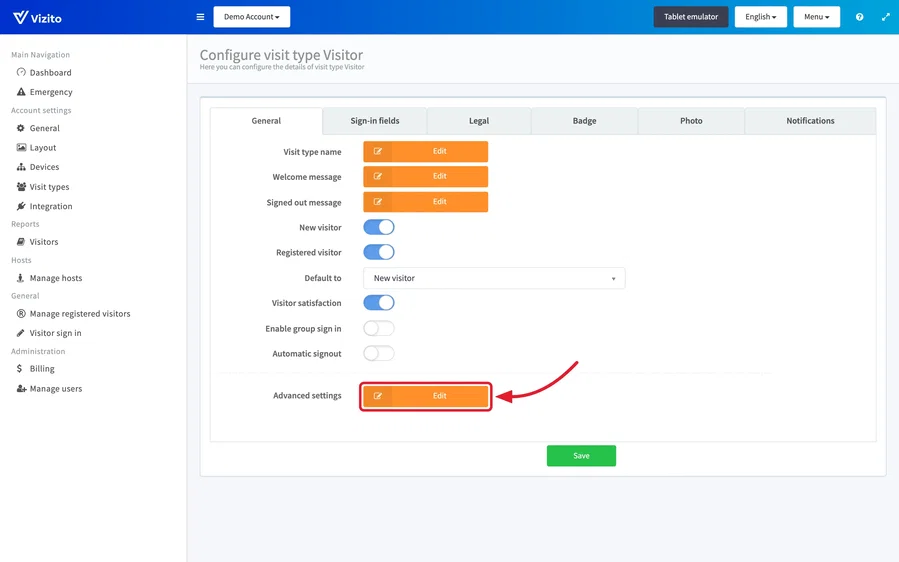
Scroll to the bottom of the “General” tab, to the “Advanced settings” row, and click “Edit”.
-
Change what you need and click “Save”.
Some rows in these windows open a window of their own. Those inner windows have no “Save” of their own, only “Close”: what you type in them is stored when you click “Save” in the advanced settings window behind them.
Account-wide advanced settings
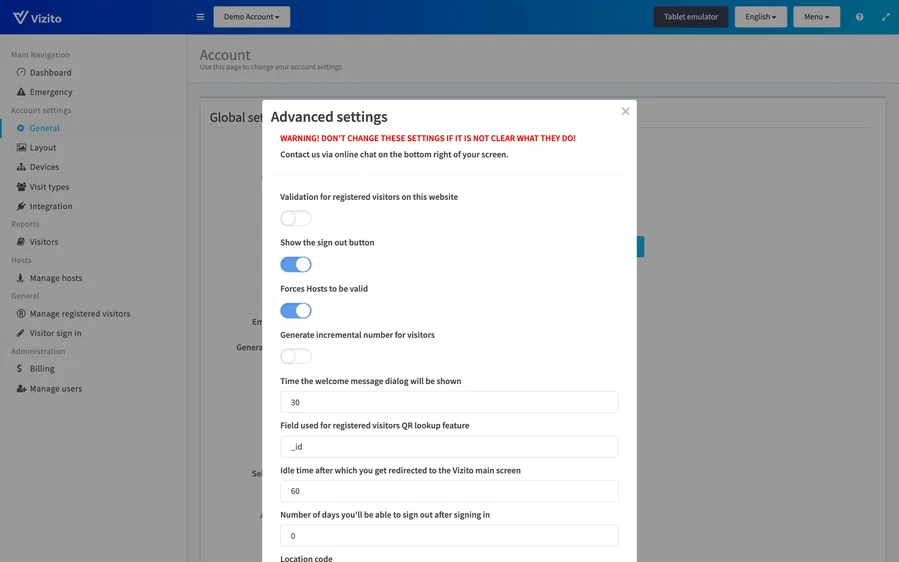
The window lists the settings in this order.
-
Validation for registered visitors on this website: applies the sign-in field rules of the visit type when you add or edit a registered visitor in the backoffice. Switched on, every field the visit type marks as “Mandatory” has to be filled in before you can save. Switched off, only the first name is required, which helps when you enter people whose details you do not have yet. It changes nothing on the tablet. See Sign-in field configuration.
-
Show the sign out button: shows or hides the “Sign out” button on the main screen of the app. Switch it off where visitors never sign themselves out, for instance when reception signs them out from the backoffice or when automatic sign out does it. A tablet whose “Welcome screen buttons” is set to “Sign out only” under “Account settings” > “Devices” keeps its sign out button either way, so it is never left with no buttons at all.
-
Forces Hosts to be valid: switched on, the visitor has to pick a host from the list and a typed name that matches nothing is refused. Switched off, whatever the visitor types is accepted: when the search finds nothing the app offers a “host not known” entry, the sign in goes through, and the typed text is stored as the host name. No notification is sent in that case, because there is no host record behind the name. See Host configuration.
-
Generate incremental number for visitors: gives every sign in at this location a number that counts up. The counter runs per location, never resets, and the number is stored on the visit, where the API and the webhook can read it. Use it when you need a running visitor number, for example to reconcile with a paper logbook.
-
Time the welcome message dialog will be shown: in seconds. How long the confirmation message stays on screen after a sign in or a sign out before the app returns to the main screen. The visitor can always close it earlier with “OK”. Raise it if your welcome message is long, and remember that a visitor who walks away leaves the message on screen for this long. A sign in through “Skip the sign in page” (below) always uses 5 seconds instead.
-
Field used for registered visitors QR lookup feature: the field whose value the QR code of a registered visitor carries, and the field that is matched when that code is scanned. The default is Vizito’s own internal identifier,
_id. Point it at one of your own fields, a badge number or an employee number for instance, when you want the codes you already print to work at the tablet. The values in that field have to be unique within the location, otherwise a scan can match the wrong person. Changing it invalidates every QR code already handed out, since those still carry the value of the old field. See QR code sign in. -
Idle time after which you get redirected to the Vizito main screen: in seconds. How long a half-finished sign in may sit untouched before the app clears it and returns to the main screen, so the next visitor does not walk up to someone else’s details. Enter 0 to switch it off, which leaves the screen exactly where the previous visitor abandoned it.
-
Number of days you’ll be able to sign out after signing in: how far back the app and the backoffice look for visitors who are still signed in. The default, 0, means a visitor can only sign out on the day they signed in. Set it to 1 and someone who signed in yesterday still appears in the sign out list today. It applies to the sign out list on the tablet, the sign out lists in the backoffice and the “currently signed in” figures on the dashboard. Raise it for sites where visitors stay overnight or where a shift runs past midnight.
-
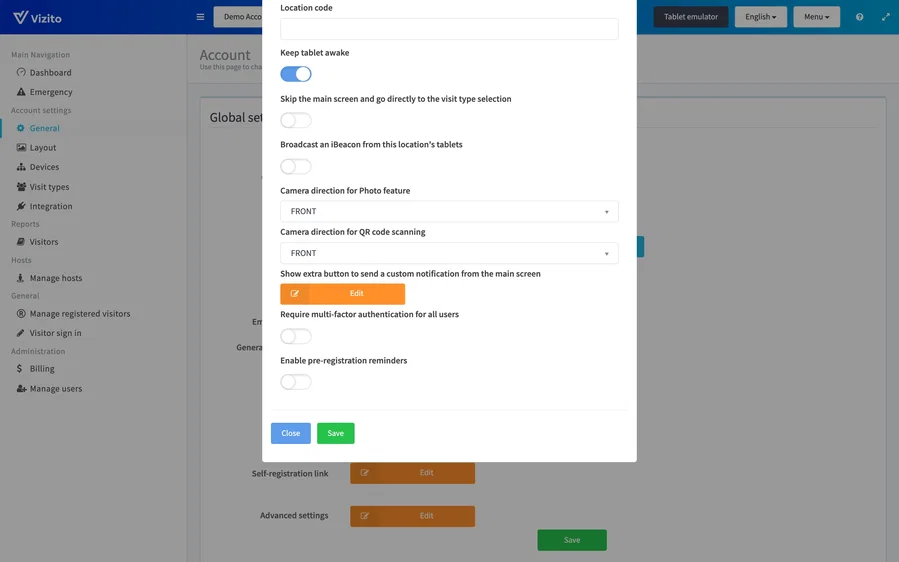
Location code: a short code for this location. The backoffice shows it in brackets behind the location name everywhere locations are listed: the location button in the top bar, the location pickers and the integrations page. It is useful once you run enough locations that the names alone stop telling them apart. Visitors never see it.
-
Keep tablet awake: switched on, the app keeps the tablet from going to sleep, so the sign-in screen is always on. Switched off, the tablet follows its own operating system timeout. This applies to the iOS and Android apps, not to a browser kiosk. To dim the screen outside opening hours instead of letting the tablet sleep, use Energy saving.
-
Skip the main screen and go directly to the visit type selection: the app opens on the visit type list instead of the welcome screen, which saves the visitor a tap. Be aware of what lives on that main screen: the sign out button, the QR scan button, the contactless sign in QR code and the custom notification button. None of them are reachable when you skip it, and the back button is hidden as well. Only use this on a tablet that does nothing but sign visitors in.
-
Broadcast an iBeacon from this location’s tablets: every tablet of this location transmits the same Bluetooth iBeacon. An invited visitor who added the Wallet pass from their invitation to Apple Wallet then sees the pass appear on their lock screen when they arrive at your door, without having to search for it. See the “Wallet pass” module in Invitations. A tablet that cannot transmit, because Bluetooth is off or the device has no support for it, simply carries on as a normal kiosk. Switching it on reveals four more rows:
- iBeacon UUID: leave it empty and Vizito generates one the first time you switch beaconing on. It is kept from then on, so passes already in a visitor’s Wallet keep working.
- iBeacon major and iBeacon minor: two numbers from 0 to 65535 that identify this location within the UUID. Leave them at 1 unless you already run beacons and want to fit Vizito into your own numbering.
- iBeacon signal strength at 1 metre (dBm): from -127 to 0, and -59 by default. This is a calibration value phones use to estimate how far away the beacon is, not a transmit power. Only change it if you know the measured value for your tablets.
-
Camera direction for Photo feature: FRONT or BACK, the camera used to take a visitor photo. Some Android devices ignore this setting and use their own default.
-
Camera direction for QR code scanning: FRONT or BACK, the camera used to scan QR codes. Some Android devices ignore this setting as well.
-
Show extra button to send a custom notification from the main screen: “Edit” opens a window of its own. It puts a button on the main screen of the app that sends a fixed message by email, by SMS text message, or both, the moment a visitor taps it. Most sites use it as a help button, so a visitor who finds the reception unattended can call someone.
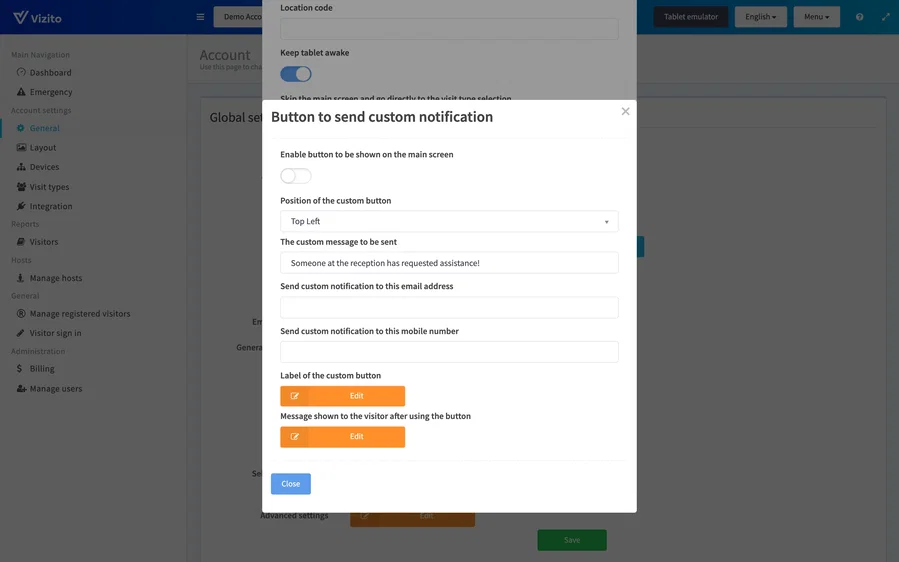
The window holds:
- Enable button to be shown on the main screen: switches the button on.
- Position of the custom button: one of nine positions on the main screen, from top left to bottom right.
- The custom message to be sent: the text that goes out. It is also the subject of the email, prefixed with “Vizito - “.
- Send custom notification to this email address: one address.
- Send custom notification to this mobile number: one number, in international format, for instance +32 471 12 34 56.
- Label of the custom button: the text on the button itself, per language.
- Message shown to the visitor after using the button: the confirmation the visitor gets once the notification is on its way, per language.
The button only appears on the tablet when it is enabled, has a position, a message, a label and a confirmation message in the language the tablet is showing, and at least an email address or a mobile number. Leave any of those empty and the button stays hidden without an error.
-
Require multi-factor authentication for all users: switching this on turns on two-factor authentication for every backoffice user of this location at once, and every user you add afterwards starts with it on. The second factor is a six-digit code that Vizito emails to the user at every sign in; there is no authenticator app and nothing to set up on a phone. Switching it back off does not remove two-factor authentication from users who already have it, and there is no per-user switch. Users who sign in through single sign-on are not affected, since their identity provider handles authentication. See Two-factor authentication for the code page, missing codes and resets, and User roles.
-
Enable pre-registration reminders: once an hour Vizito looks for registered visitors whose visit starts within the number of days you set below, and emails them their invitation again. Each visitor is reminded once. Visitors who already filled in their own details, and visitors without an email address, are skipped. See Pre-registration.
-
Days before visit to send pre-registration reminder: how far ahead to look. This row only appears once reminders are switched on. With 2, a visitor expected today or in the next two days gets the reminder.
Advanced settings of a visit type
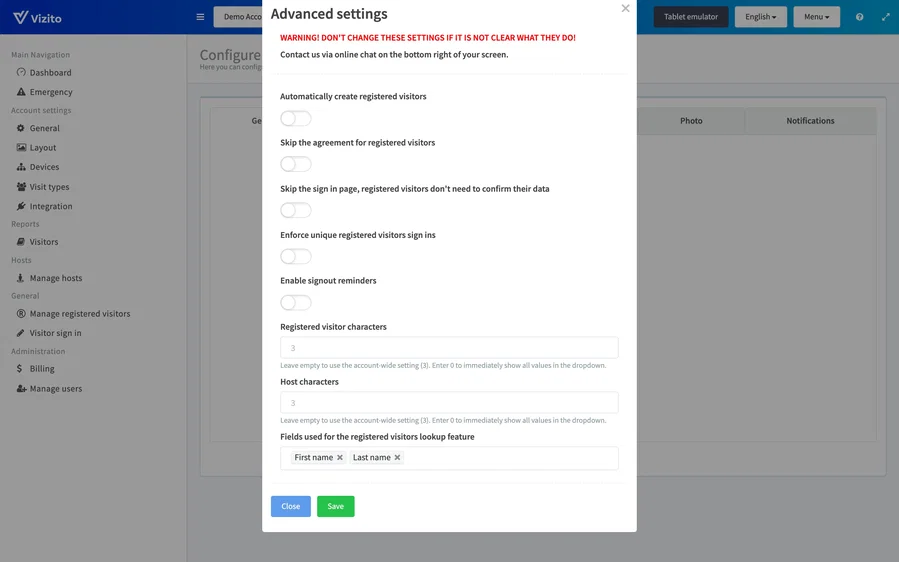
These belong to one visit type, so you can give each flow its own behaviour.
-
Automatically create registered visitors: every visitor who signs in on this visit type and is not already known is added to your registered visitors, so their next visit is a lookup instead of a form. On a busy reception this grows the list quickly, so check your retention period for registered visitors under “Privacy settings”. See Registered visitors and Privacy.
-
Skip the agreement for registered visitors: a visitor who signed in as a registered visitor is not shown the agreements screen, and not asked for a signature either. Visitors who sign in as a new visitor still get both. Use it where the same contractors return every day and have already signed. See Agreements.
-
Skip the sign in page, registered visitors don’t need to confirm their data: a registered visitor who scans their QR code is signed in straight away, with no sign-in form, no agreements and no signature. The confirmation message is shown for 5 seconds. This only works together with QR code sign in, see QR code sign in.
-
Enforce unique registered visitors sign ins: a registered visitor who is still signed in on this visit type cannot sign in a second time. They stay in the lookup list, but selecting them does not fill in the form until they have signed out. Use it where a double sign in would corrupt your headcount, for instance for contractors on a construction site.
-
Enable signout reminders: emails the host a reminder to sign their visitor out, with a sign out button in the mail that does it in one click. Nothing is sent if the visitor already signed out. The host needs an email address for this, so it works only when “Host datasource” is set to “Managed within Vizito” or “Combined (Vizito and External)”. Switching it on reveals two more rows:
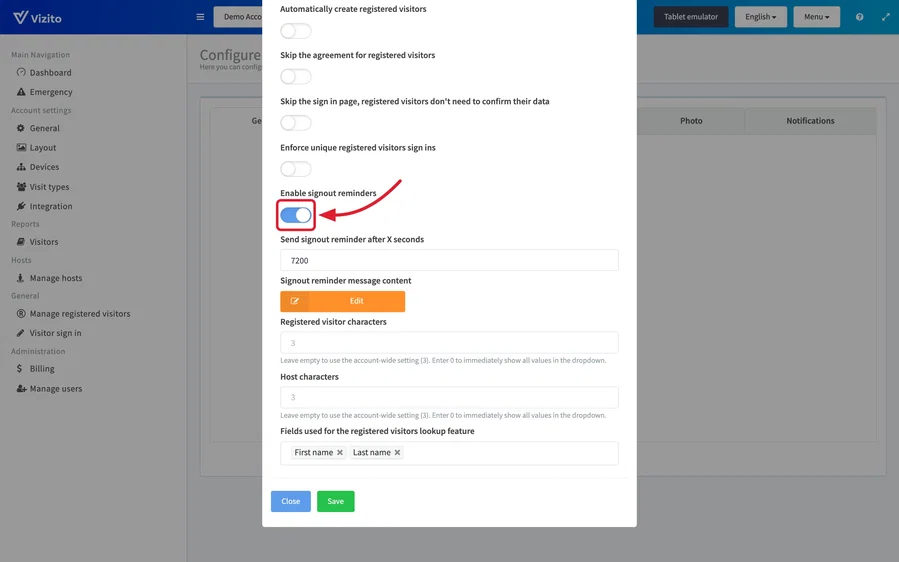
- Send signout reminder after X seconds: counted from the moment the visitor signed in. 30 minutes is 1800, an hour is 3600.
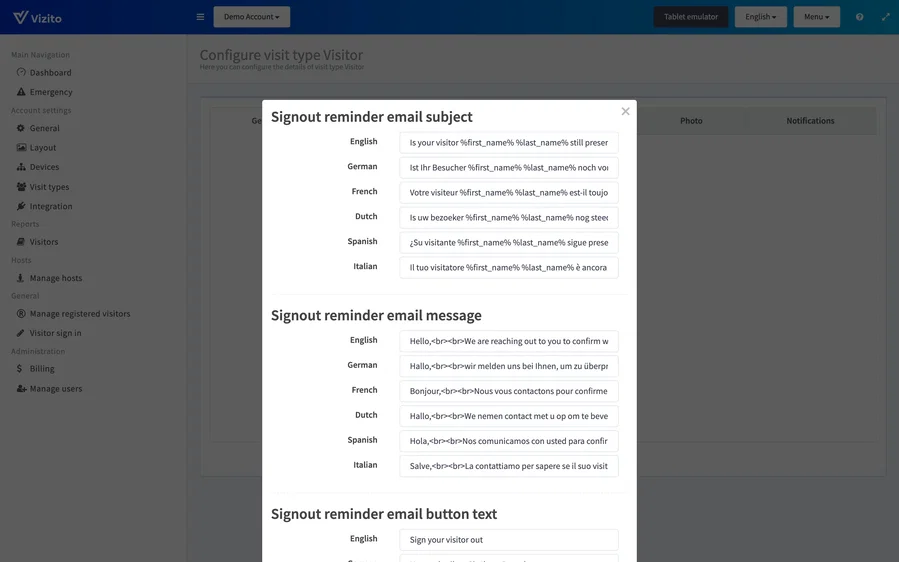
- Signout reminder message content: opens a window where you set the email subject, the message and the text on the sign out button, each per language. The “Placeholders” button in that window lists the values you can drop into the text. The window itself only has “Close”, so click “Save” in the advanced settings window afterwards.
-
Registered visitor characters and Host characters: the number of characters a visitor has to type before the lookup starts showing matches, for this visit type. Leave the field empty to use the account-wide value, which the field shows as a grey placeholder. Enter 0 to show every entry as soon as the field is tapped. Below the number you set, the app only recognises the complete value typed out in full and otherwise prompts for more characters, which is what keeps one visitor from browsing the names of everyone else on the list.
-
Fields used for the registered visitors lookup feature: the fields the tablet searches when a registered visitor looks themselves up. The default is “First name” and “Last name”. Pick your own when your visitors are easier to find another way, a reference number or a company name for instance. Two things follow from your choice: the fields you pick are named in the prompt of the lookup field, and the visitor has to type the values in the order you list them here, separated by spaces. The results themselves always show the first and last name, whatever you search on.
Related articles
- Settings covers the everyday settings on the Layout and General pages.
- Visit types covers the rest of the visit type configuration.
- Devices covers the settings that belong to a single tablet.