iPadOS Badge Printing
Vizito prints a visitor badge automatically as soon as somebody signs in at the kiosk. This guide sets that up on an iPad: first switch badge printing on in the backoffice, then link the label printer over Bluetooth or WiFi.
The screenshots use a Brother QL-820NWB label printer and an iPad. For everything Vizito prints to, see our compatible label printers list.
Prerequisite: connect your tablet to your Vizito account first. Follow the steps on the Device activation help center page.
Only Brother printers. The iPad app prints through Brother’s own printer software, and the “Search printer” step below only finds the Brother models on the compatible label printers list. A printer of another brand, however well it is paired in the iPad’s Bluetooth settings, never appears in Vizito. To use another printer, run the kiosk on a Windows PC instead: see Chrome Badge Printing.
Enable badge printing in the backoffice
-
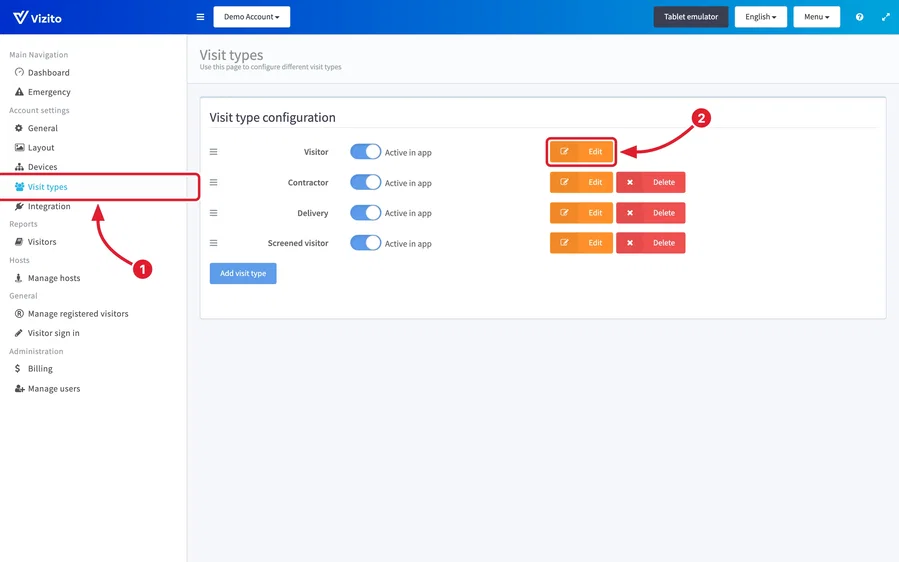
Go to the Vizito backoffice and select “Account settings” > “Visit types” in the left menu.
-
Click “Edit” next to the visit type you want to print badges for.
-
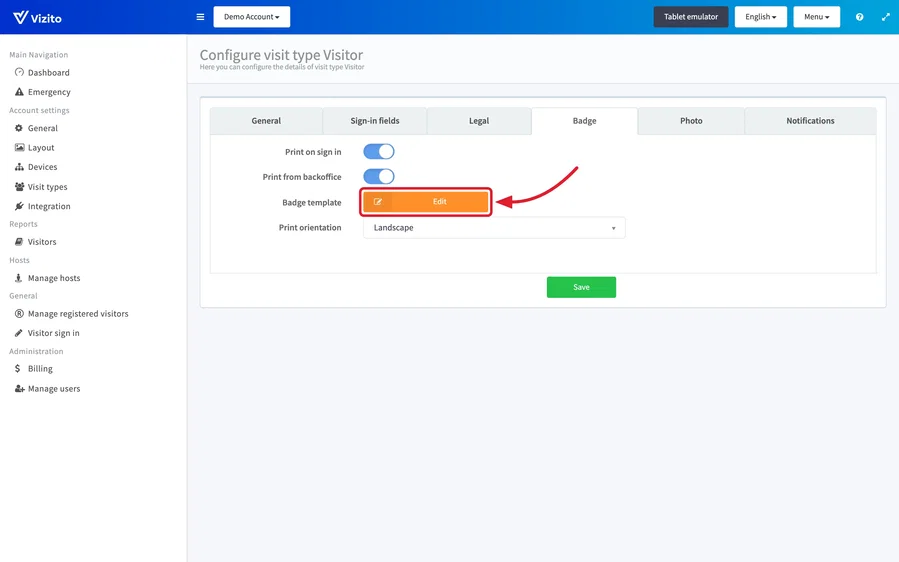
Open the “Badge” tab and check under “Badge template” that the visit type has a badge. The print switches stay locked, with the hint “Requires a badge template.”, until it has one.
- If there is a badge, you see a card with a preview, the badge’s name and its “Type”. “Edit” under the card opens the badge so you can change it.
- If you see “No badge for this visit type yet”, click “Choose a template” or “Design from scratch” and follow Badge designer. When another visit type already has a badge, “Use badge from…” lets this visit type print the same one.
-
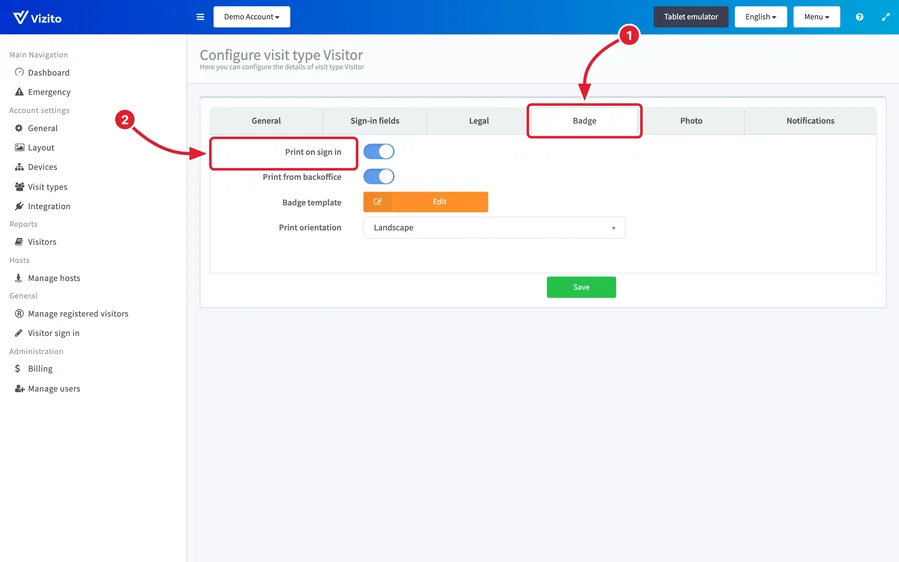
Under “Printing”, turn on “Print on sign in”, “Print from backoffice” or both.
- Print on sign in prints a badge automatically as soon as a visitor finishes signing in on the tablet.
- Print from backoffice lets staff print and reprint badges from the visitor list. You need this when you sign visitors in through Visitor sign in.
-
Check “Print orientation” under “Printer”. For a badge of the type “HTML template”, click “Landscape” or “Portrait” to match the way your labels come out of the printer. A badge of the type “Designed badge” carries its own orientation, and the row reads “Set in the badge design.”
-
Click “Save” at the bottom of the “Badge” tab. The print switches only take effect once you save.
To change what is on the badge, see Badge designer for a badge of the type “Designed badge” and HTML editor for a badge of the type “HTML template”.
How would you like to link your printer?
Click to skip to the correct section:
Link the printer via Bluetooth
-
Put your printer in close proximity to your tablet.
-
Click on the power switch to turn the printer on.
-
Enable Bluetooth on the printer:
- Go to the Menu
- Scroll through the options until you find “Bluetooth”
- Turn Bluetooth ON
-
Enable Bluetooth on the iPad:
-
On your iPad, go to Settings and look for Bluetooth.
-
Turn Bluetooth ON
-
Select the correct printer from the list.
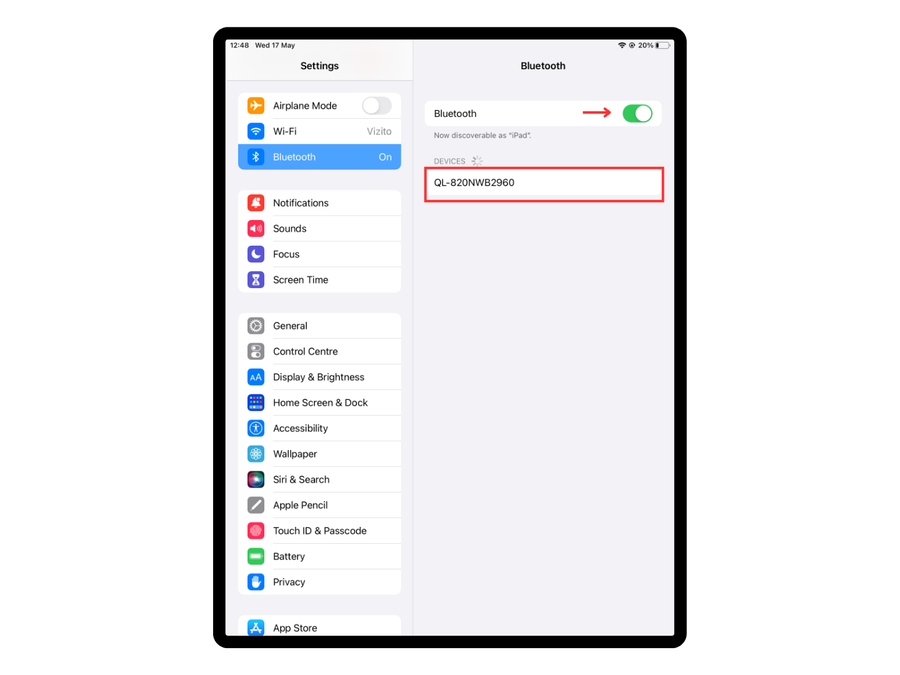
*If you would like to know the Device name of the printer, you can search for it under the printer’s Bluetooth menu.
-
It should show “Connected” if it is successful.
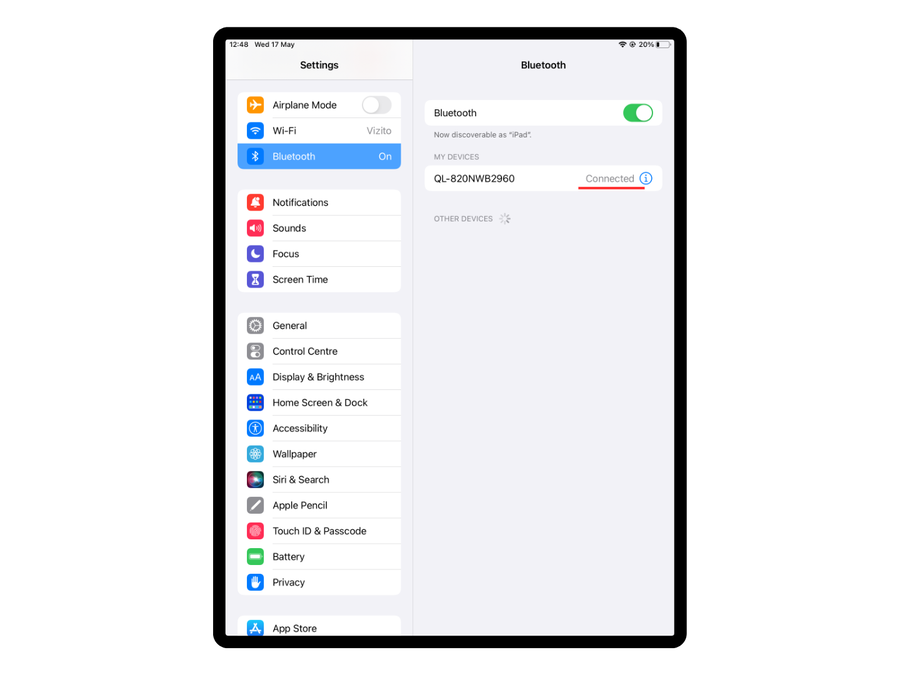
*If you cannot find the printer on the list of devices, try restarting the printer, then double-check that the Bluetooth option is ON in the printer settings.
-
-
Open the Vizito app on your device. You should see a “Choose printer” window prompt. If you do not see this prompt, click on “Sign In” and then “Back” to refresh the Vizito app.
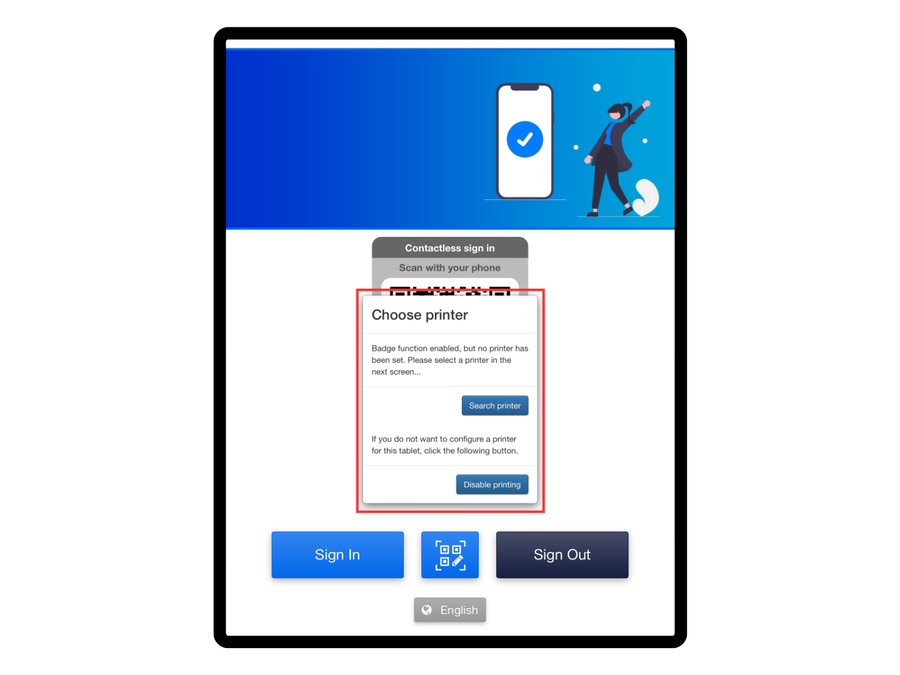
-
Click on “Search printer”
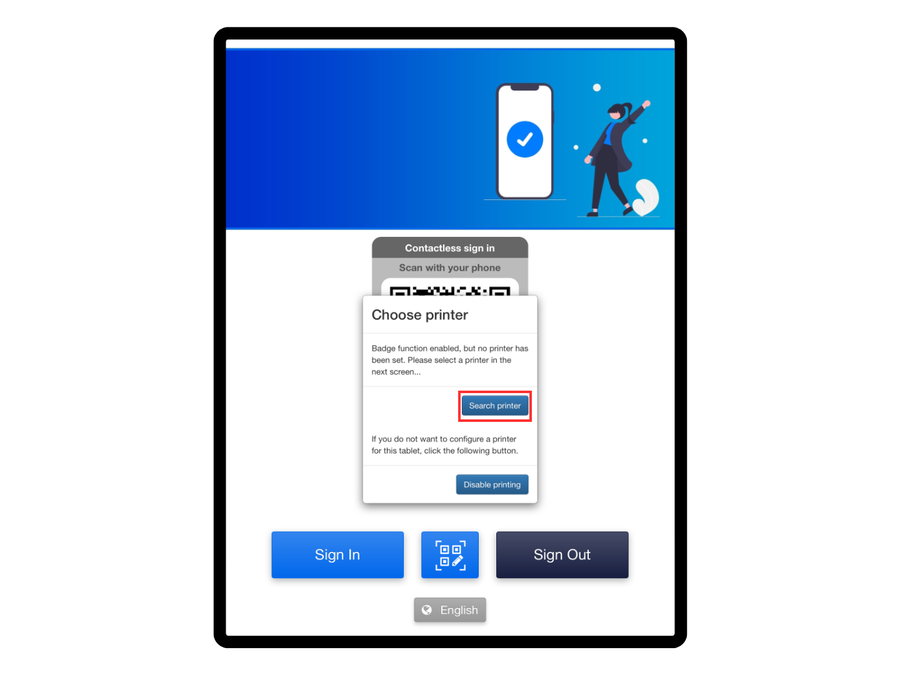
-
The printer should be visible as an option under Bluetooth printers. Click on “Set printer to _________”.
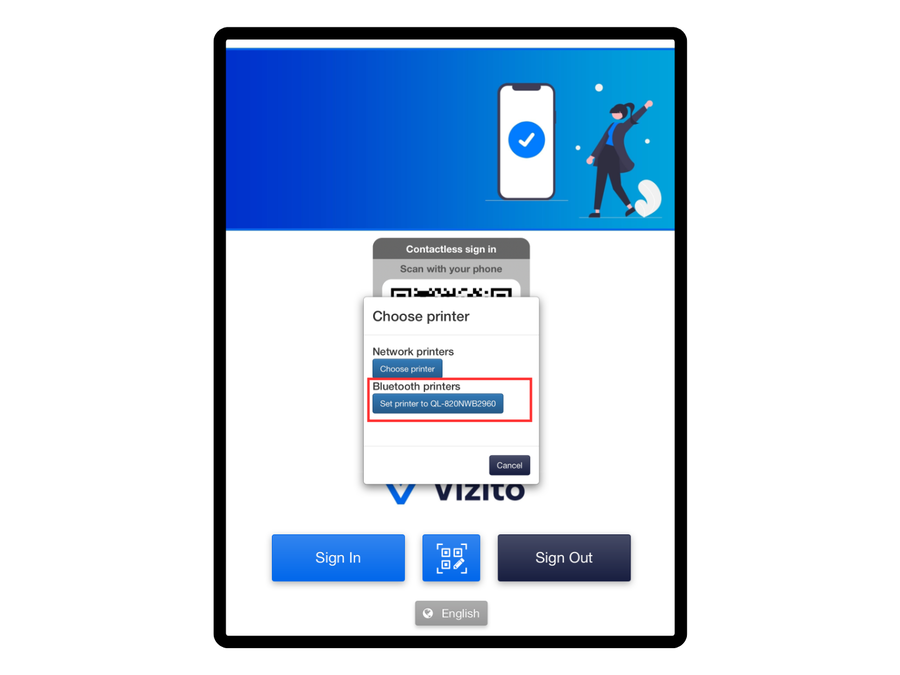
-
Do a test sign in. The badge should print automatically.
-
Change the badge if it does not print as desired. In the backoffice, open the “Badge” tab of the visit type and click “Edit” under the badge. To check the result without signing in again, click “Test print via kiosk” on the same tab: the iPad prints the badge with sample visitor data. This needs version 2.0.4 or later of the Vizito app on the iPad. See Badge designer for the label roll of a designed badge, and HTML editor for the label size of an HTML template.
Note: the Bluetooth connection drops when either the iPad or the printer is turned off, so re-connect the printer after either one has been off.
Note: most label printers accept one connection at a time, so an error while pairing usually means another device is still connected to the printer. Turn that device off, or disconnect the printer from it, and pair again. Once a kiosk has selected a printer, that printer is also listed under “Printers” at the bottom of the Devices page in the backoffice, where you can clear it, confirm with “Yes” and click “Save”. Before any kiosk has selected a printer that section is empty and only explains how to add one, so there is nothing to clear there yet.
Link the printer via WiFi
-
Put your printer in close proximity to your tablet.
-
Click on the power switch to turn the printer on.
-
Connect the printer to your WiFi network.
-
Open the Vizito app on your device. You should see a “Choose printer” window prompt. If you do not see this prompt, click on “Sign In” and then “Back” to refresh the Vizito app.
-
Click on “Search printer”.
-
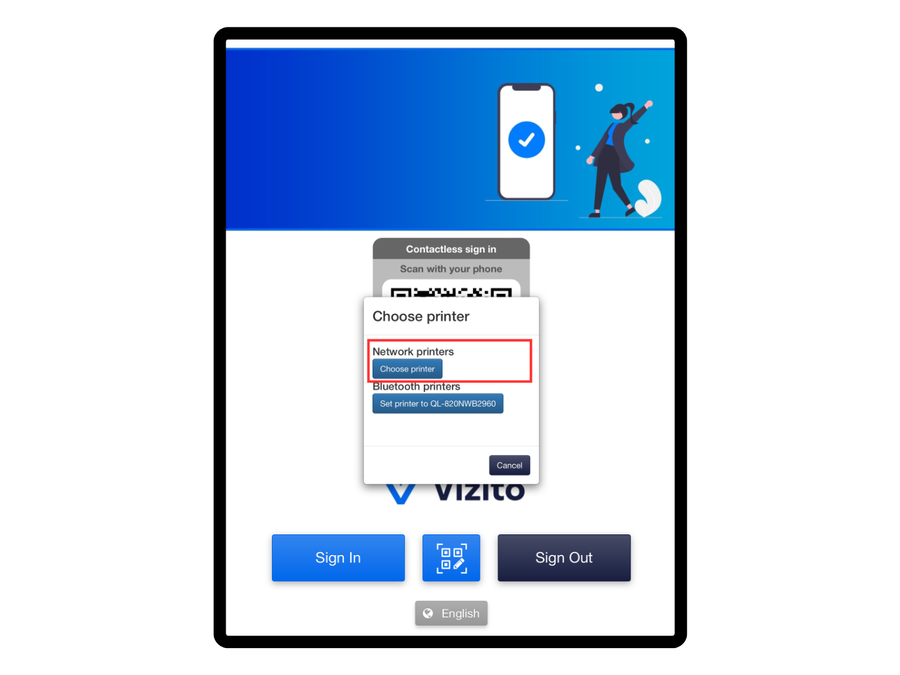
Under Network printers, click on the “Choose printer” button.
-
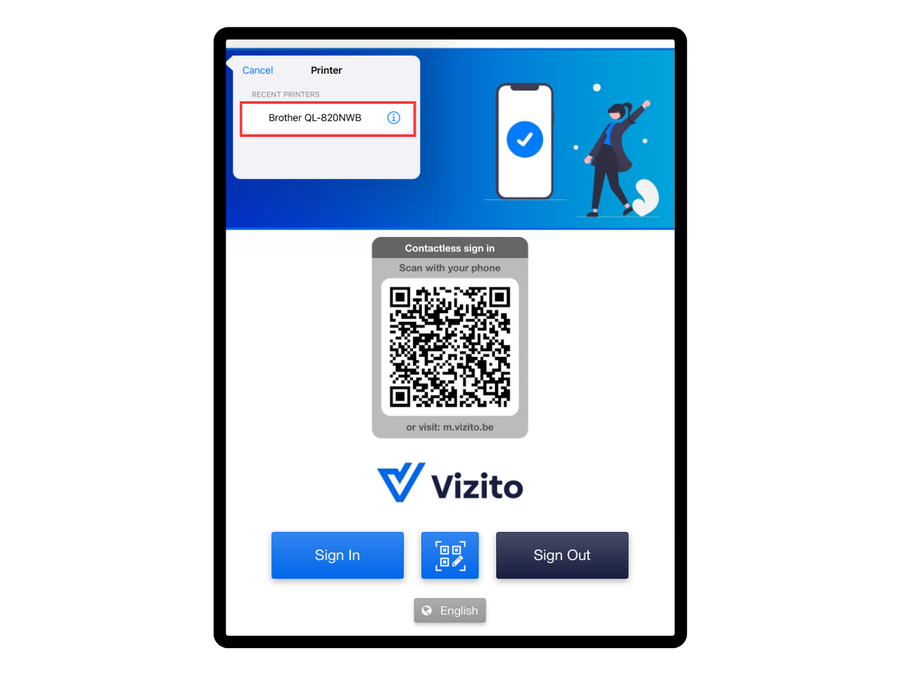
Select the correct printer from the list.
-
Do a test sign in. The badge should print automatically.
-
Change the badge if it does not print as desired. In the backoffice, open the “Badge” tab of the visit type and click “Edit” under the badge. To check the result without signing in again, click “Test print via kiosk” on the same tab: the iPad prints the badge with sample visitor data. This needs version 2.0.4 or later of the Vizito app on the iPad. See Badge designer for the label roll of a designed badge, and HTML editor for the label size of an HTML template.
Check the printer in the backoffice
Once a kiosk has selected a printer, it is listed under “Printers” at the bottom of the Devices page in the backoffice. While that section is still empty it tells you what is missing: printing has to be enabled and a badge template defined before you can select the printer in the Vizito app on the tablet.