Invitations
In this article
An invitation is an email you send to a registered visitor before their visit. It carries a personal QR code they can scan at the reception, the address of your site, and a link to fill in their own details up front.
Adding or saving a registered visitor sends nothing. The email goes out only when you click “Invite”.
Send an invitation
-
Open the Vizito backoffice and select “General” > “Manage registered visitors” in the left menu.
-
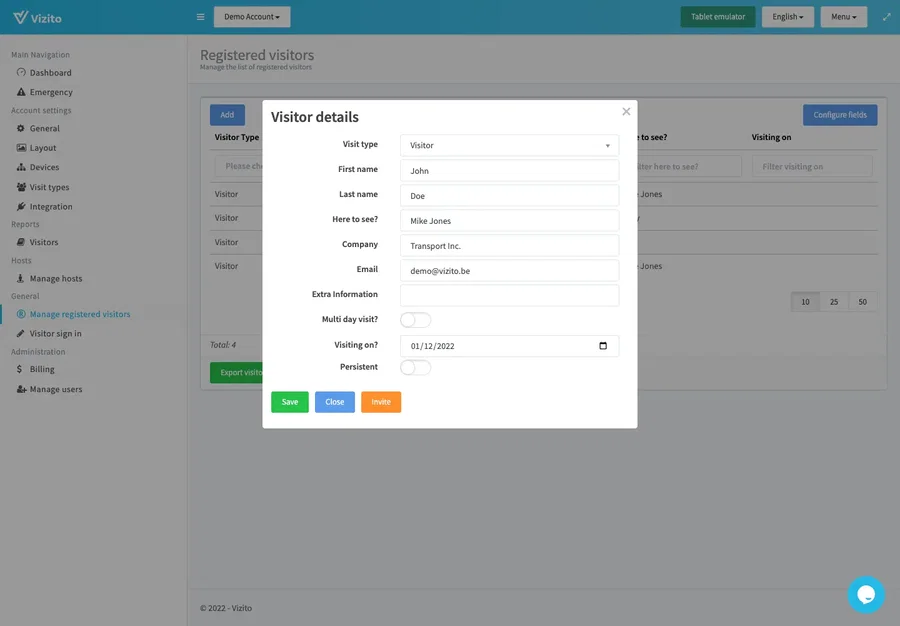
Click the row of the visitor you want to invite. The “Visitor details” window opens. If the visitor is not in the list yet, click “Add” first: see Registered visitors.
-
Check “Email”. The invitation is sent to that address, so without one there is nothing to send.
-
Set “Language”. It decides the language of both the invitation email and the pre-registration page behind it.
-
Set “Visiting on?” if the visit is for particular days. For a visitor who is already on the list this field is a “From - To” range, so a visit that runs over several days needs nothing extra. The “Multi day visit?” switch belongs to the “Add” window and is not in this one: see Registered visitors.
-
Click “Invite”. This saves the visitor and sends the email in one step. “Save” only stores the visitor.
What the visitor receives
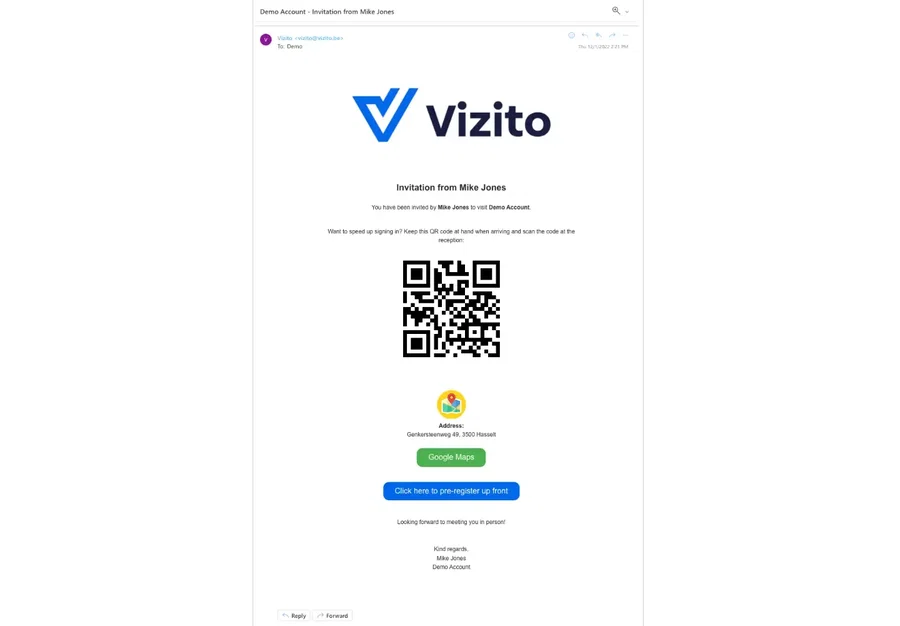
The email names the host who invited them and carries a QR code of their own. Scanning that code at the tablet signs the visitor in without them looking themselves up, provided “QR code sign in” is switched on under “Account settings” > “General”: see QR-code signin.
Under the code the mail repeats your address with a “Google Maps” button, and the button below that opens the visitor’s pre-registration page, where they can complete their details and sign your agreements before they arrive. See Pre-registration.
The invitation has no calendar attachment: there is no .ics file, so the visit does not appear in the visitor’s calendar by itself. Your own meeting invitation does that. What the email can carry instead is a wallet pass: with the “Wallet pass” block active, the mail shows “Add to Apple Wallet” and “Add to Google Wallet” buttons, and the pass holds the same QR code, so the visitor has it at hand on their phone without opening the email. The pass is an addition, not a replacement: the QR code stays in the email as well.
Invite a group in one go
Each visitor still gets their own email with their own QR code, which is what you want for a board meeting, an audit or a training day.
-
Select “General” > “Manage registered visitors” in the left menu.
-
Tick the rows of the visitors you want to invite. “Bulk action”, below the list, stays greyed out until you tick at least one row.
-
Click “Bulk action” and choose “Send invitations”. The emails go out straight away.
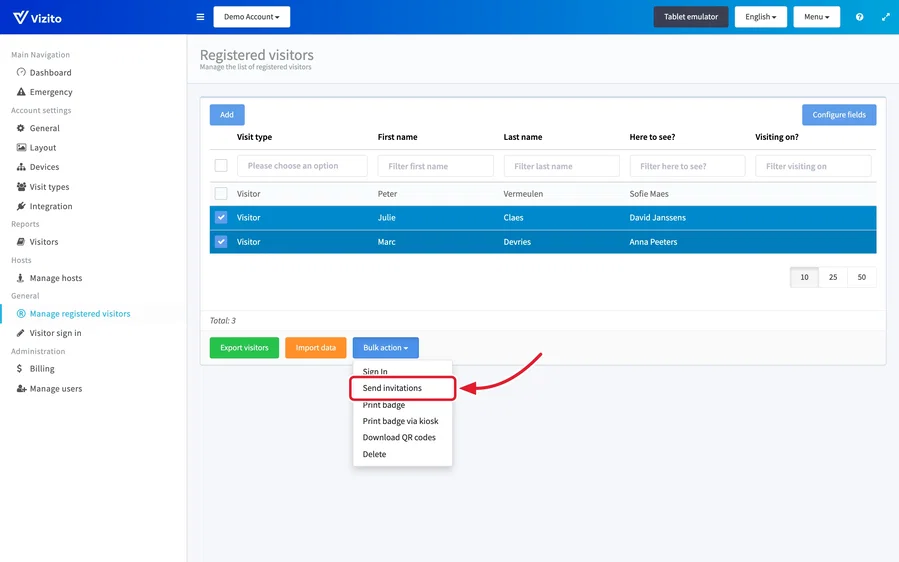
The same menu holds “Download QR codes”, for when you want the codes of the ticked visitors yourself instead of mailing them. The rest of the menu is covered in Registered visitors.
Change what the invitation looks like
The invitation is a template of the visit type, so a contractor can be sent a different email than an ordinary visitor.
-
Select “Account settings” > “Visit types” in the left menu and click “Edit” on the visit type you want to change.
-
Open the “Notifications” tab.
-
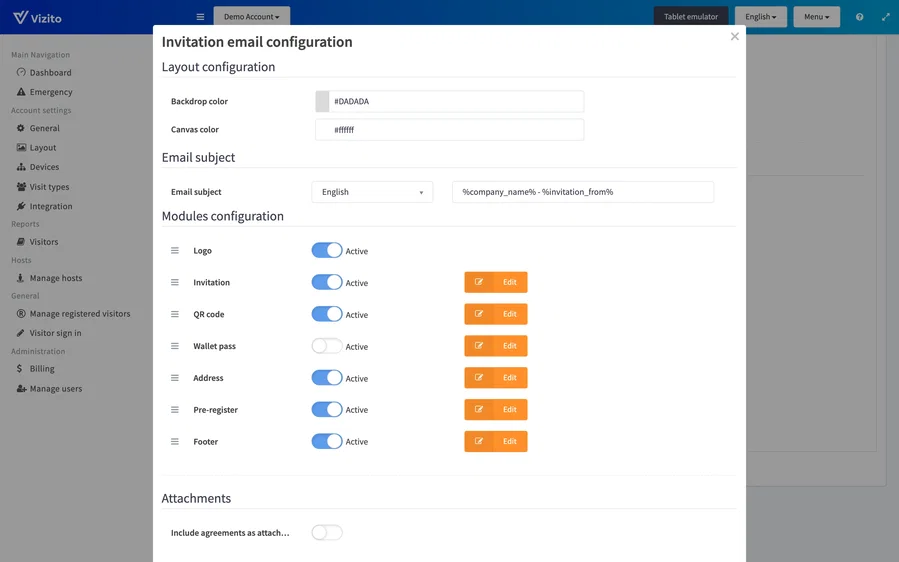
Click “Edit” next to “Email template invitation”. The “Invitation email configuration” window opens.
-
Change what you need (the sections are described below).
-
Click “Close”, then click the green “Save” on the “Notifications” tab behind it.
The window has no “Save” of its own. “Close” hands your changes back to the “Notifications” tab, and only the green “Save” on that tab stores them. Leaving the tab without saving loses everything you just set.
The sections of the window
“Layout configuration” holds the two colours the mail is built from: “Backdrop color” and “Canvas color”.
“Email subject” is set per language. Pick a language in the dropdown and type
the subject that goes with it, so a Dutch-speaking visitor gets a Dutch subject
line. The subject is a template: anything between percent signs is filled in
when the mail is sent, and the default reads
%company_name% - %invitation_from%.
“Modules configuration” lists the blocks the mail is made of: “Logo”, “Invitation”, “QR code”, “Wallet pass”, “Address”, “Pre-register” and “Footer”. Each row has an “Active” toggle that puts the block in the mail or leaves it out, and every row except “Logo” has an “Edit” for what goes inside it. Drag a row by the handle on its left to move a block up or down; the order of the rows is the order of the blocks in the email.
“Attachments” is two separate settings. “Include agreements as attachments in email” sends your agreements along with the invitation, see Agreements. “Include file links as attachments” sends files of your own, which you add with the “Add file URL” button. Both labels are cut short on screen by the width of the column.
There is no separate sender name or signature setting. The closing of the mail is the “Footer” block.
The Wallet pass
With the “Wallet pass” block active, the invitation carries an “Add to Apple Wallet” and an “Add to Google Wallet” button.
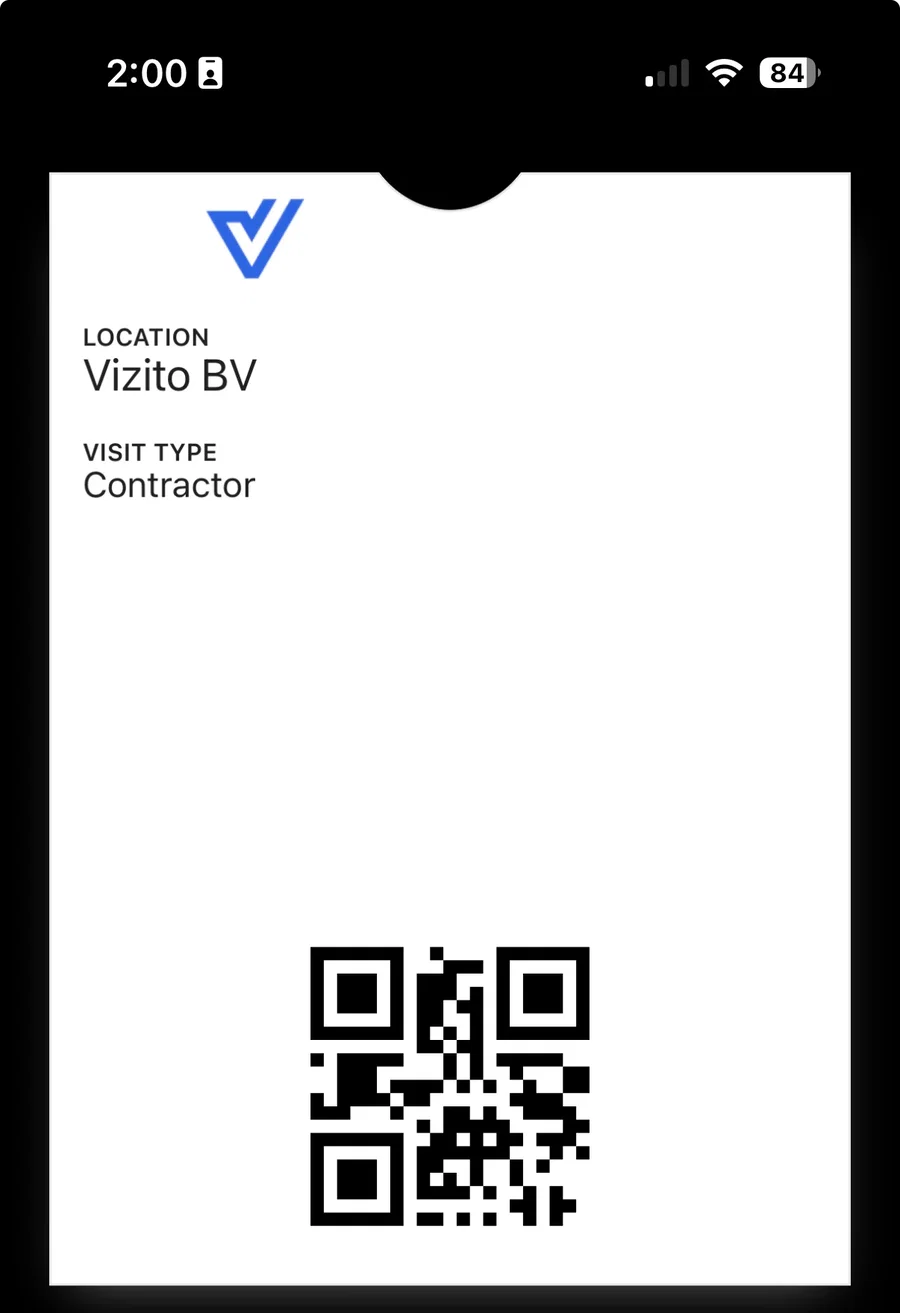
The visitor taps the one for their phone and the visit is stored as a pass, in your colours. The front shows your company, the visit type and the same QR code that is in the email; the date of the visit and the host sit on the back of the Apple pass and in the details of the Google one. At the reception they open the pass and hold the phone in front of the tablet, exactly as they would with the email.
To switch it on, open the “Invitation email configuration” window of the visit type as described above, set the “Active” toggle of the “Wallet pass” row, and click “Save” on the “Notifications” tab. The block is off on existing visit types until you do. Invitations sent before you switched it on do not get a pass; send them again.
To switch it off again, open the same window, clear the “Active” toggle of the “Wallet pass” row and save. New invitations then go out without the two buttons. Everything you already sent keeps working: a pass a visitor has added stays in their wallet and its QR code still scans at the tablet, and the buttons in earlier invitations still add the pass. A pass that is already on someone’s phone cannot be withdrawn. It stops working only when the visitor is removed from your registered visitors, for example by your data retention settings, or when your account is closed. After the visit the pass stays in the visitor’s wallet as a record of it.
On an iPhone the pass can appear on the lock screen by itself when the visitor arrives, if your tablets broadcast an iBeacon. Switch on “Broadcast an iBeacon from this location’s tablets” under “Account settings” > “General” > “Advanced settings”: every tablet of the location then transmits the same signal, and a pass that was added from your invitation is shown as soon as the phone is within range. Google Wallet does not react to the beacon; on Android the visitor opens the pass themselves. See Advanced settings.
The pass is an addition to the email, not a replacement: the QR code and the pre-registration link stay in the mail, and a visitor without a wallet app loses nothing.
The invitation did not arrive
Work through this list before contacting us; it covers nearly every case.
- Was it sent? “Save” stores the visitor, only “Invite” sends. After a bulk send, the result lists who was skipped and why: “Skipped (no valid email address)” means the visitor’s “Email” field is empty or wrong.
- Is the account on a trial? A trial account can send 10 invitations. When the limit is reached, every Global admin receives an email titled “Vizito: invitation email limit reached”, the bulk result reads “Skipped (invitation limit reached)”, and single invitations are refused. Automatic invitations from the calendar integration and pre-registration reminders stop as well. Subscribe under “Administration” > “Billing”, or contact us if you need to test with more. An expired trial sends nothing at all.
- Spam or quarantine. Unless you set up your own sender, the mail comes from vizito@vizito.be. Ask the visitor to check their spam folder and, for a company address, ask their IT to release it from quarantine and allow the sender.
- Your own FROM address. “Email address FROM” under “Account settings” > “General” only takes effect once the address is verified with the link we mail you and the domain authenticates Vizito through SPF or DKIM (“Setup FROM address” walks you through it). Until then the invitation goes out from vizito@vizito.be, and an address that is verified but not authenticated ends in spam more often than the default.
- The template. The invitation is the “Email template invitation” of the visitor’s visit type. If every block in “Modules configuration” is switched off, the mail is empty. The switches under “Notifications to your visitors” (“Email visitor on sign in” and the others) have nothing to do with invitations; they may stay off.
- The language. “Language” on the visitor decides the language of the mail and of the pre-registration page. Check it when a visitor reports a mail they cannot read rather than a mail they did not get.
When you contact us, send the visitor’s email address, the time you clicked “Invite”, the visit type and a screenshot of the “Visitor details” window. We can then see whether the mail left our servers and what the receiving server answered.