Billing & Invoices
In this article
Everything about paying for Vizito lives on one page of the backoffice: subscribing at the end of your trial, the details that go on your invoice, what you have used of your plan this month, your subscription and the buttons to change it, and every invoice Vizito has sent you.
Open the Vizito backoffice and select “Administration” > “Billing” in the left menu. Global admins and Local admins see this menu item, and so does anyone whose custom role includes the privilege “Open the billing page”. The other built-in roles do not see it, see User roles.
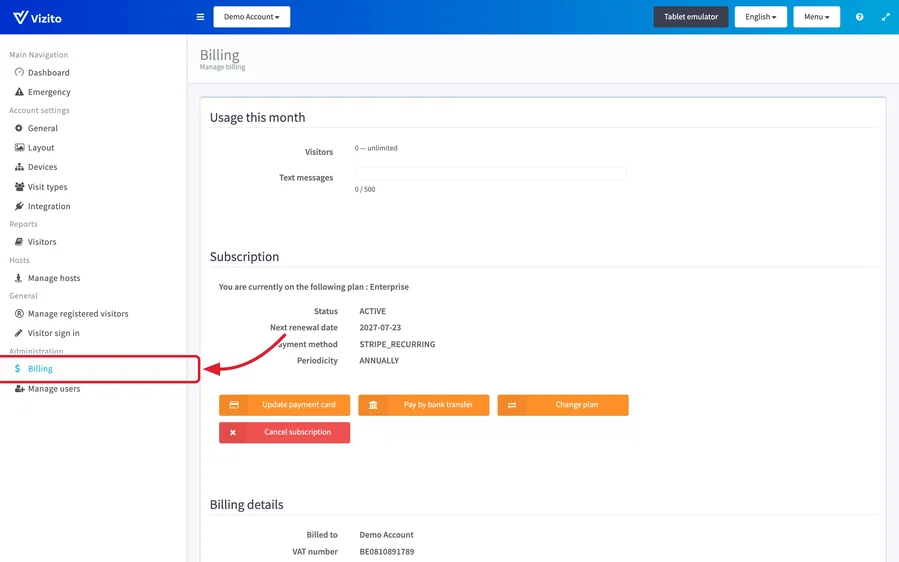
The page is laid out top to bottom as “Usage this month”, “Subscription”, “Billing details” and, once you have a subscription, “Open invoices” and “Invoices”. The sections below follow that order, then walk through the things you come to this page to do.
Usage this month
The meter at the top shows what this calendar month has used of what your plan includes.
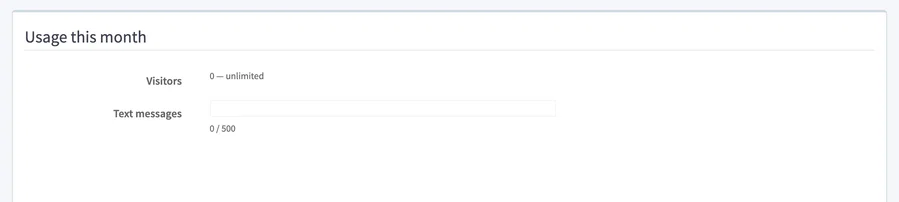
- Visitors: every sign in at this location this month, against the number of visitors your plan includes.
- Text messages: every SMS text message Vizito sent for this location this month, for instance host notifications, against the number your plan includes.
| Plan | Visitors per month | Text messages per month |
|---|---|---|
| Standard | 100 | 100 |
| Pro | 300 | 300 |
| Enterprise | unlimited | 500 |
The bar turns orange when you reach 80% of a limit, with the note “You are close to what your plan includes this month.” It turns red once you are over it: “You have used more than your plan includes this month.” followed by the plan that would cover your usage and a “Change plan” link that opens the plan change request with that plan already selected. The counters start again on the first day of every month.
During a trial the meter only shows the counts, with the note “Your trial has no monthly limits. Subscribe to see what your plan includes.”
How visits are counted
One registration is one sign in. The meter counts every sign in at this location during the calendar month, however it was done: on the tablet, by scanning the contactless QR code, from an invitation, or by the reception from the backoffice. Nothing else counts: a visitor who is pre-registered but never turns up is not a registration, signing out is not one, and the number of hosts, users, tablets or QR codes makes no difference.
- The same visitor comes back on several days. Every sign in counts, so a contractor who signs in on Monday, Tuesday and Wednesday is three registrations. A visitor who stays several days and signs in once counts once.
- A returning registered visitor. Signing in as a registered visitor counts exactly like signing in as a new visitor. Registering a visitor makes their sign in faster; it does not make it free.
- A group. Every member of a group who is signed in is a registration.
- Which month. The meter uses the calendar month in UTC, so a sign in late in the evening on the last day of the month can already land in the next month. The counters start again on the first day of every month.
Nothing stops when you reach the limit. Visitors keep signing in, hosts keep being notified and the visitor log keeps filling up; only the meter turns red and names the plan that would cover the month. An occasional busy month is fine. When your usage stays above what your plan includes month after month, we contact you to move to that plan, which is what the fair-use wording on the pricing page means. Text messages work the same way on a paid plan: see Text messages included in your plan.
Subscribe
While you are on a trial, the “Subscription” section reads “You are currently on the following plan : Starter” with the number of days your trial has left, and shows the three plans underneath: Standard, Pro and Enterprise, each with its price and what it includes. Current prices are on the pricing page.
- Fill in your billing details first, in the “Billing details” section further down the page. “Billed to”, “Country” and “Invoicing email address” are required, and the country decides the currency you are quoted in. See Billing details below.
- Pick “Annually” or “Monthly” above the plans. Annual billing is cheaper per month. In a few countries only annual billing is offered.
- Click “Choose plan” on the plan you want. Your billing details are saved and checked first. If something is missing, the field is marked in red with the note “Please complete the fields marked in red.”
- A secure payment page opens. Enter your card details and confirm. You can enter a promotion code there if you have one.
- You are brought back to the Billing page with the message “Thank you for subscribing!”. Your account is active on the new plan straight away, and your first invoice is emailed to the invoicing email address.
If the payment did not go through you are brought back with the message “Something went wrong with processing your subscription.” Nothing has been charged in that case. Check your payment details and try again, or contact us through the chat at the bottom right of the backoffice.
Which currency and VAT you are quoted
The country in your billing details decides what the plan cards show:
- Belgium: prices in euro including 21% VAT.
- Another EU country: prices in euro. Without a VAT number the price includes 21% VAT; enter a valid VAT number and the price is shown and invoiced without VAT, under the reverse charge rule. The card says which of the two applies (“incl. 21% VAT” or “excl. VAT”).
- United Kingdom: prices in pound sterling.
- Everywhere else: you choose between USD, EUR and GBP above the plans. No VAT is charged.
Pay on invoice instead of by card
Companies in the European Union, and companies elsewhere that choose annual billing, can be invoiced instead of paying by card. Under each plan card there is a link “Or request to pay on invoice”.
- Fill in your billing details as above. The invoice will be made out to exactly what you enter there.
- Click “Or request to pay on invoice” under the plan you want.
- The message “Your request for pay on invoice was succesfully submitted.” confirms that we have received it.
We then set up the subscription, activate your account and send the invoice to your invoicing email address, to be paid by bank transfer. The request can only be sent once; if you need to change it, contact us through the chat or at info@vizito.eu.
Your subscription
Once you are subscribed, the “Subscription” section shows the plan you are on and, underneath it, the subscription as our invoicing system knows it.
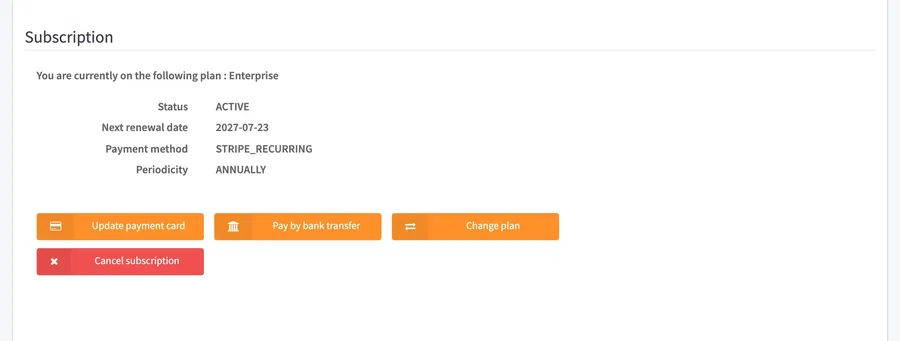
- Status: normally ACTIVE. A subscription you have cancelled reads CANCELLED, see Cancel your subscription.
- Next renewal date: the day your subscription renews and the next invoice is made. For a cancelled subscription this row reads “Expires on” instead.
- Payment method: how your subscription is paid. STRIPE_RECURRING is a card that is charged automatically on every renewal, WIRETRANSFER an invoice you pay by bank transfer.
- Periodicity: ANNUALLY or MONTHLY.
Below the details are the buttons to change something about the subscription: “Update payment card”, “Pay by bank transfer” or “Pay by card”, “Change plan” and “Cancel subscription”. Each is explained in its own section below.
Two things to know about these buttons. First, replacing your card is the only change that is applied on the spot. A plan change, a switch of payment method or a cancellation is a request: invoices are made by us, not generated automatically, so we apply the change on our side and confirm it to you by email. Second, you can have one open request of each kind at a time. While one is open, its button is replaced by a note such as “We have received your plan change request and will contact you.”
Billing details
These details are what your invoice is made out to. They are separate from the company name and address on the Account page, which are what your visitors see, so renaming a location never changes who is invoiced.
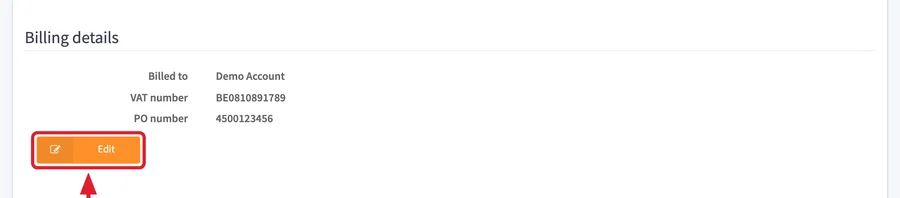
For a subscribed account the section shows a short summary, “Billed to”, “VAT number” and “PO number”, with an “Edit” button that opens the full form. During a trial the form is always open, since these details are what you subscribe with.
-
Select “Administration” > “Billing” in the left menu and scroll to “Billing details”.
-
Click “Edit” if the details are shown as a summary.
-
Fill in the fields, described below.
-
Click “Save”. The message “Your account settings were saved.” confirms it. “Cancel” throws away what you typed and shows the saved details again.
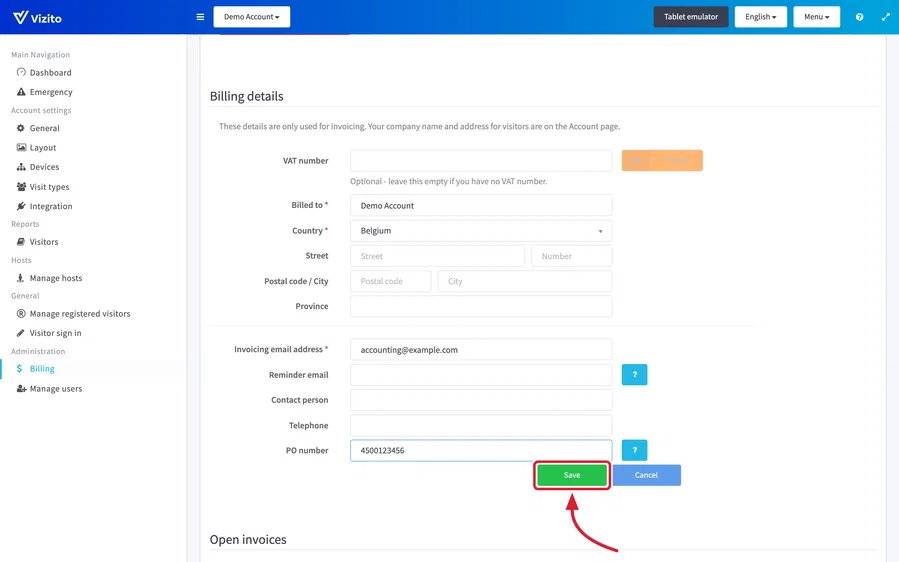
The fields, in the order they appear:
- VAT number: optional. See Enter your VAT number below for what it does and how to check it.
- Billed to: the legal name of the company or organisation the invoice is addressed to. Required.
- Country: required. Start typing to search the list.
- Street and Number, Postal code / City, Province: the invoice address.
- Invoicing email address: required. Every invoice is sent to this address as a PDF, on every renewal. Use a mailbox your accounts payable department reads.
- Reminder email: where payment reminders go. Leave it empty and they go to the invoicing email address.
- Contact person and Telephone: who we contact with a question about an invoice.
- PO number: your purchase order reference, printed on the invoices. See Add a PO number below.
PDF or UBL through Peppol
Every invoice is emailed as a PDF to the invoicing email address. Organisations that are registered on the Peppol network also receive the same invoice as a UBL e-invoice in their accounting software, without asking for it: we look your organisation up on the network by its VAT number and by its national business register number. Make sure the VAT number in your billing details is the one your Peppol registration uses. If your accounting expects an e-invoice and none arrives, or if you receive one and would rather not, contact us at info@vizito.eu.
Changes to the address, contact person, telephone number, reminder email and PO number are applied to your customer record immediately. A change to the name on the invoice or to the VAT number is looked at by us before your next invoice is made, because both decide what the invoice says and how it is taxed. You do not have to do anything for that; if we have a question we contact you at the invoicing email address.
Enter your VAT number
A VAT number is never required, but for a company in the European Union outside Belgium it is what decides whether the invoice carries VAT. Without a number, 21% VAT is added and the field says so: “Optional - without a VAT number your invoice carries 21% VAT.” With a valid number the invoice is made out without VAT under the reverse charge rule. Belgian companies are always invoiced with 21% VAT, and the field only says “Optional - leave this empty if you have no VAT number.” Outside the EU no VAT is charged either way.
-
Type the number in “VAT number”, with its country prefix, for instance BE0810891789 or NL123456789B01. Spaces, dots and dashes are fine. The prefix selects the matching “Country” for you.
-
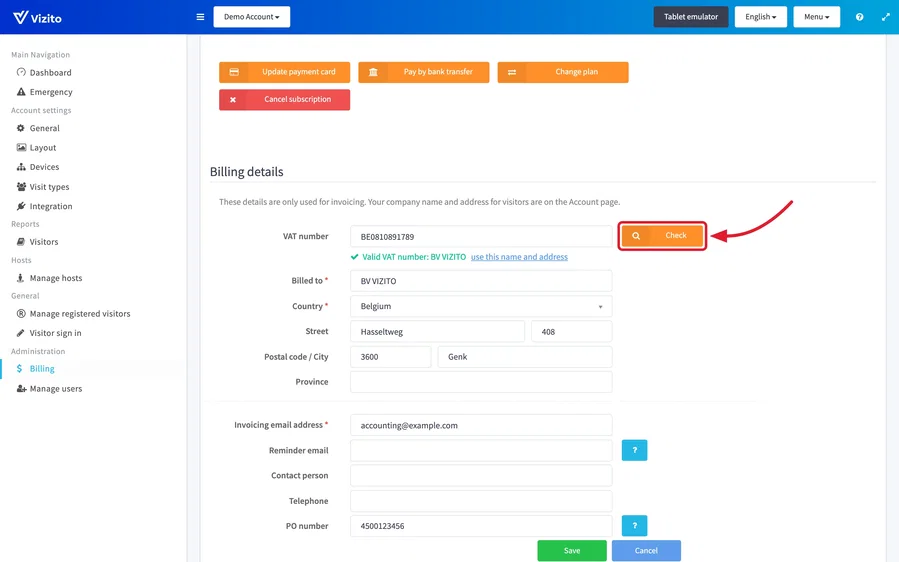
Click “Check”. The number is looked up in the European VIES register.
-
A valid number shows “Valid VAT number:” followed by the name the register holds. That name is put into “Billed to”, and any address fields that were still empty are filled from the register. Click “use this name and address” to fill them again after you have changed something.
-
Click “Save”.
If the check fails you see why: “This VAT number is not known in the European VIES register.”, “This VAT number does not have the right format for this country.”, “This VAT number belongs to another country than the one selected.” or “This VAT number does not start with a European country code.” A number that VIES does not know is also refused when you save, so a wrong number never ends up on an invoice. When the register itself is down the field says “The European VIES service cannot be reached right now. You can save; we will check the number ourselves.”
Add a PO number
Many accounts payable departments only pay an invoice that carries their purchase order number. Vizito prints it on every invoice, and you manage it yourself.
- Open “Billing details” and click “Edit” if the details are shown as a summary.
- Type the reference in “PO number”. It can be up to 60 characters, so “4500123456 / cost centre 88” fits.
- Click “Save”.
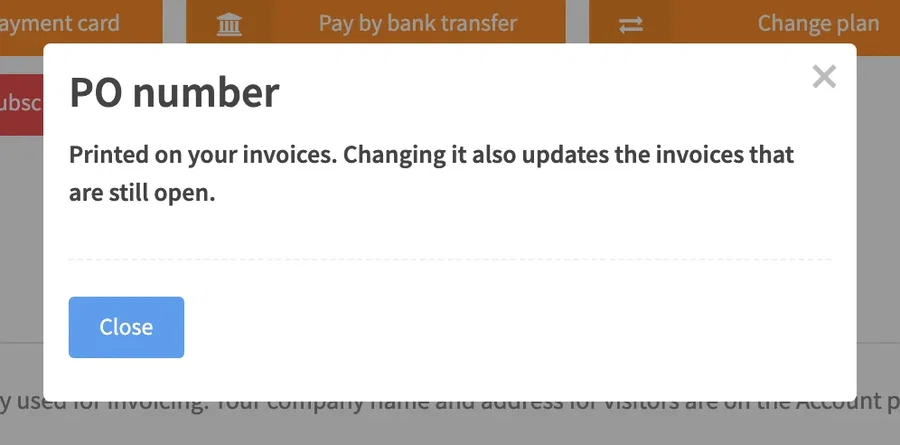
The new number is applied straight away, both to your subscription and to any invoices that are still open, so an invoice you have not paid yet can be downloaded again with the number on it. A subscribed account also shows the PO number in the summary of the billing details, where the finance department can read it without opening the form. When your purchase order is renewed, change the number here before the next invoice is made.
Update your payment card
When your subscription is paid by card, a card that expires or is replaced is yours to update, without waiting for a payment to fail.
- Scroll to “Subscription” and click “Update payment card”. The button is only shown for a subscription that is paid by card.
- A secure page opens in a new tab. Enter the new card and confirm.
- You are brought back to the Billing page with the message “Payment details updated”, which tells you that the new card is saved, that any open invoice will be charged again shortly, and that future payments use it.
The old card is removed from your subscription, every renewal from now on is charged to the new card, and if a payment had already failed on the old card, the open invoices are charged again on the new one within a few minutes. You do not have to pay them by hand.
If the button answers “Payment card cannot be updated”, the card cannot be replaced online for this subscription. Contact us at info@vizito.eu and we sort it out.
Switch between card and bank transfer
The button next to it switches how the subscription is paid. On a subscription paid by card it reads “Pay by bank transfer”; on one paid by invoice and bank transfer it reads “Pay by card”. Click it and the request is sent, confirmed with “Request sent”: “We have received your request and will contact you shortly.” We change the payment method on the next invoice and confirm by email. Until then the page shows “We have received your payment method request and will contact you.” where the button was.
Change your plan
Moving to a larger or a smaller plan is a request: tell us which plan you want and we change the subscription and confirm by email.
-
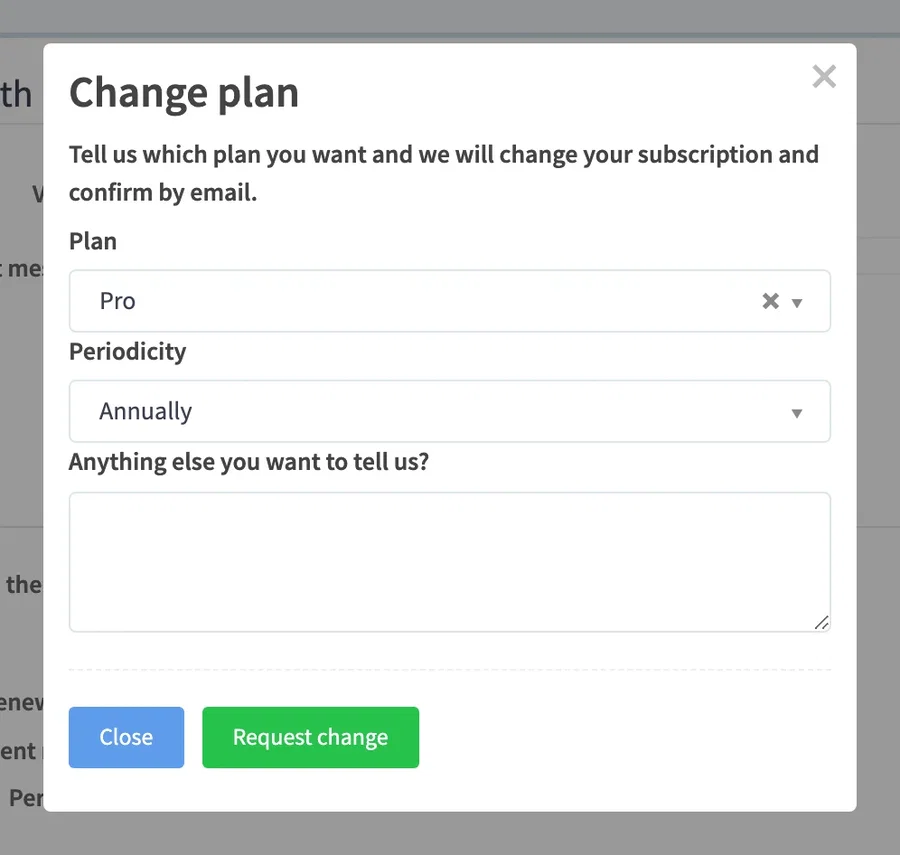
Scroll to “Subscription” and click “Change plan”. When the usage meter reports that you are over your plan, the “Change plan” link next to that note opens the same window with the recommended plan already selected.
-
Pick the plan under “Plan”. The plan you are on is greyed out.
-
Pick “Annually” or “Monthly” under “Periodicity”.
-
Use “Anything else you want to tell us?” for anything we should know, for instance from which date.
-
Click “Request change”. The message “Request sent” confirms it.
Until we have applied the change, the section shows “We have received your plan change request and will contact you.” in place of the button.
Cancel your subscription
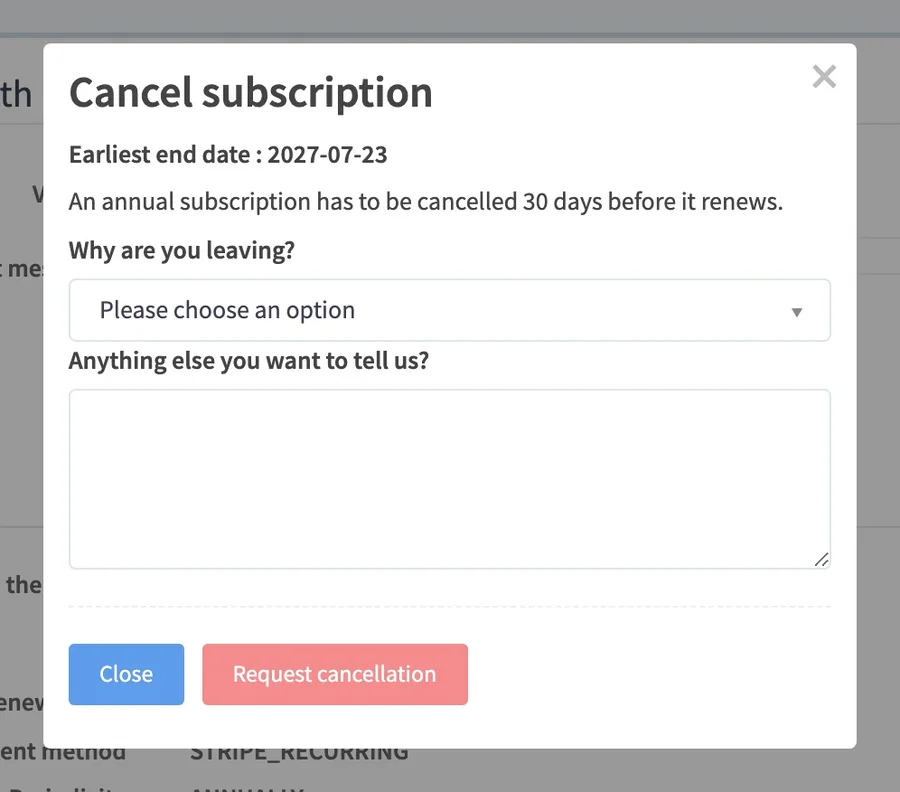
You cancel from the Billing page as well. The window tells you first when the subscription can end.
-
Scroll to “Subscription” and click “Cancel subscription”.
-
Read “Earliest end date”. A monthly subscription ends at its next renewal date. An annual subscription has to be cancelled 30 days before it renews; the window says so with “An annual subscription has to be cancelled 30 days before it renews.” If that date has already passed, the coming term still runs and the subscription ends after it, and the window warns you: “The notice period for the coming renewal has passed, so the subscription ends after the next term.”
-
Pick a reason under “Why are you leaving?”: “Too expensive”, “We do not use it enough”, “We are moving to another product”, “The office or company is closing”, “Missing features” or “Something else”. If you pick “Missing features”, tell us which feature in the box underneath; the request cannot be sent without it.
-
Add anything else under “Anything else you want to tell us?”.
-
Click “Request cancellation”. The message “Cancellation requested” confirms it: “We have received your request and will confirm the end date by email.”, with the earliest end date repeated.
Until we have processed the request, the section shows “We have received your cancellation request and will contact you.” Once we have, the status of the subscription reads CANCELLED and the “Expires on” row shows the day it ends. Vizito keeps working as normal until then. After that day the subscription details stay visible on the page for reference, but the buttons are gone, since there is nothing left to change.
If you cannot reach the Billing page, for instance because nobody on your account has a role that opens it any more, contact us through the chat in the backoffice or at info@vizito.eu.
Download an invoice
Every invoice is emailed to the invoicing email address when it is made. The Billing page holds them all, so a lost email is never a problem.
-
Scroll to “Invoices” at the bottom of the Billing page. It lists every paid invoice with its “Date”, “Reference”, “Total amount”, “Period start” and “Period end”. Click a column heading to sort by it, and use the page size buttons under the table to show 10, 25 or 50 at a time.
-
Click the download icon in the “PDF” column of the invoice you need. The PDF is saved with the invoice reference as its file name.
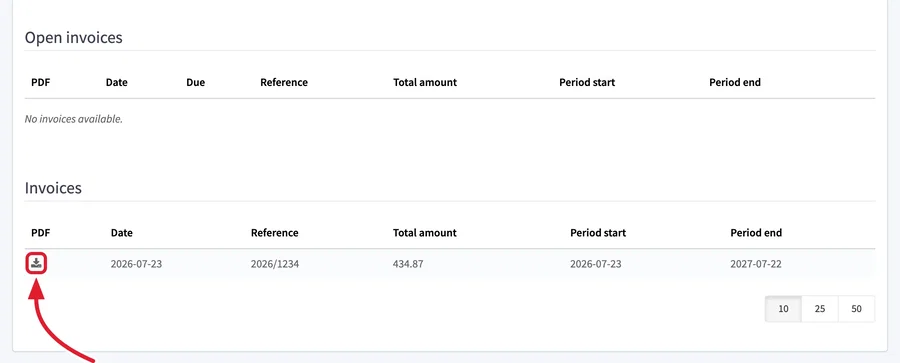
An invoice that is not paid yet is in the “Open invoices” table above it, with the same download icon. The tables read “No invoices available.” until your first invoice has been made.
Pay an open invoice
“Open invoices” lists the invoices that have been issued and not paid yet, with a “Due” column for their due date and a “Pay invoice” button on each row. When there is an open invoice past its due date, the backoffice also says so in the bar at the top of every page: “You have open invoices that are due. Click here to view them.” brings you to this page, and the exclamation mark next to the location name opens the “Unpaid invoice” warning. Once an invoice is more than four weeks overdue, the warning reads “This invoice is more than 4 weeks overdue. Immediate payment is required to keep your account active.”
- Scroll to “Open invoices” and click “Pay invoice” on the invoice.
- A payment page opens in a new tab. What it asks for depends on how your subscription is paid:
- Paid by card: an open invoice means the charge on your card failed. The page asks for a new card, and once you confirm it, the open invoice is charged again, together with any other open invoice, and future renewals use the new card. You are brought back with “Payment details updated”.
- Paid by bank transfer: the page shows this invoice and lets you pay it online. You can of course also transfer the amount to the bank account on the invoice, with the invoice reference as the payment reference; the invoice then moves to “Invoices” once we have matched the payment.
Should the button answer “Payment unavailable”, the invoice cannot be paid online at that moment. Contact us at info@vizito.eu and we help you pay it another way. A subscription paid through PayPal has no “Pay invoice” button: PayPal retries a failed payment itself.
Payment problems
The card payment failed. A failed charge leaves an unpaid invoice in “Open invoices”, and the bar at the top of the backoffice says so. Two ways to settle it, both on this page: “Pay invoice” on the invoice retries it with a new card, and “Update payment card” in “Subscription” replaces the card and retries every open invoice within minutes. Nothing is charged twice: a retry only runs while the invoice is open. Your account keeps working while the invoice is open; only an invoice more than four weeks overdue puts it at risk.
An invoice paid by bank transfer is not a receipt. When your subscription is paid by bank transfer, the PDF we email is a request for payment. It moves from “Open invoices” to “Invoices” once we have matched your transfer, which takes a few days; until then it is still open, whatever your bank says. Use the invoice reference as the payment reference to speed that up. Need proof of payment for your books? The invoice in the “Invoices” table is the paid one; download it there.
Change how you pay. “Pay by bank transfer” or “Pay by card” in “Subscription” sends the request, and we switch the method on the next invoice. See Switch between card and bank transfer.
Change who receives the invoice. Edit “Invoicing email address” in “Billing details” and click “Save”; every invoice from then on, and every reminder, goes to the new address. A change of the name on the invoice (“Billed to”) or of the VAT number is checked by us before the next invoice. Invoices already sent are not reissued to a new name.
An invoice that has already been sent needs a correction. A wrong address, VAT number or PO number on an invoice you have received is corrected by us. Fix the details in “Billing details” first, so the next invoice is right, then email info@vizito.eu with the invoice reference and what has to change; you receive a corrected invoice. A PO number you change here is put on the open invoices by itself. A change of the company the invoice is made out to, for instance after a takeover or when another entity in your group takes over the subscription, applies from the next invoice: enter the new company in “Billing details” and tell us from which date.
The account is suspended. When an invoice stays unpaid for more than four weeks after the warning in the top bar, we can suspend the location. The backoffice then shows the same screens as an expired trial: the bar reads “Your trial has expired. Please upgrade your account to regain access to your data by clicking here.”, the visitor log and the registered visitors show that line instead of your data, and the tablet answers every sign in with “Your trial has expired. Please purchase a plan!”. Nothing is deleted. The Billing page keeps working, so pay the open invoice there: “Pay invoice” on the invoice, or “Update payment card” when the card is the problem. We reactivate the location as soon as we see the payment. Email the payment confirmation to info@vizito.eu with the invoice reference, especially after a bank transfer, so we do not have to wait for the bank. If the backoffice still shows the expired-trial screens more than one working day after you paid, contact us through the same address.
Someone else pays for us. Enter that company’s details in “Billing details” and their accounts payable address as “Invoicing email address”. The location name your visitors see is unaffected.
Contact us at info@vizito.eu only when the page itself cannot do it: a card the page refuses to update, an invoice it cannot offer for online payment, or a paid invoice that has stayed in “Open invoices” for more than a week. Mention the invoice reference.
Several locations
Everything on this page is per location. A second location has its own Billing page, its own trial of 14 days from the day it is added, its own subscription and its own usage meter, whichever location it was cloned from. See Manage locations.
Related articles
- Settings covers the company name and address on the Account page, which are what your visitors see and are separate from the billing details.
- User roles explains who gets the “Administration” menu.
- Email and SMS explains the text messages a plan includes and what to check when hosts receive none.
- The pricing page lists the current prices and what every plan includes.