Sign-in links and QR codes explained
In this article
Vizito has several links and QR codes that let a visitor do something on their own phone, and they look alike. This page puts them side by side: what each one does, where you find it, and how long it lives.
| What the visitor does | Address | Where you get it | Expires | |
|---|---|---|---|---|
| Contactless QR code on the tablet | Signs in or out on their phone, now | m.vizito.be/login/... |
Shown by the tablet, switched on per device | The code changes every hour |
| Static QR code | Signs in or out on their phone, now | m.vizito.be/login/... |
“Account settings” > “General” > “Static QR codes”, printed by you | Never, until you delete it |
| Self-registration link | Registers themselves for a future visit | p.vizito.be/register/... |
“Account settings” > “General” > “Self-registration link” | Never, until you disable, regenerate or delete it |
| Invitation | Completes their details for a visit you planned, then shows the QR code at the tablet | p.vizito.be/pre-register/... and a personal QR code |
“Manage registered visitors” > “Invite” | Tied to that visitor |
| Registered visitor QR code | Signs in and out at the tablet by scanning | A personal code | “Manage registered visitors” > “Bulk action” > “Download QR codes” | Until the visitor is deleted |
Sign in on the phone, right now
The contactless QR code is the panel on the tablet’s welcome screen that reads “Scan with your phone”. Scanning it opens the sign-in form on the visitor’s phone, for this tablet and this moment: the code is renewed every hour, so a photo of it stops working. Switch it on per device under “Account settings” > “Devices” > “Edit” > “Contactless sign in”. See Contactless sign in.
A static QR code does the same without a tablet. You generate it once, print it and hang it at a door, a gate or a meeting room, and it keeps working until you delete it. It can be limited to certain visit types and tied to an entry point, so the visitor log shows which door was used. See Static QR codes.
Both open m.vizito.be. The difference is where the code lives: on a screen
that renews it, or on paper that does not.
Register before the visit
The self-registration link is a public address you share by email, on your website or in a booking confirmation. Whoever opens it picks a visit type from the ones you allowed, fills in their details, reads and signs your agreements, and ends up as a registered visitor in your backoffice, exactly as if you had added them under “Manage registered visitors”. On the day they look themselves up at the tablet or scan the QR code you send them. Use it for events, training days and contractors you do not want to enter one by one.
-
Open the Vizito backoffice and select “Account settings” > “General” in the left menu.
-
Under “Location settings”, find the “Self-registration link” row and click “Edit”. A window lists your links; click “Add link” for a new one or “Edit” on an existing one.
-
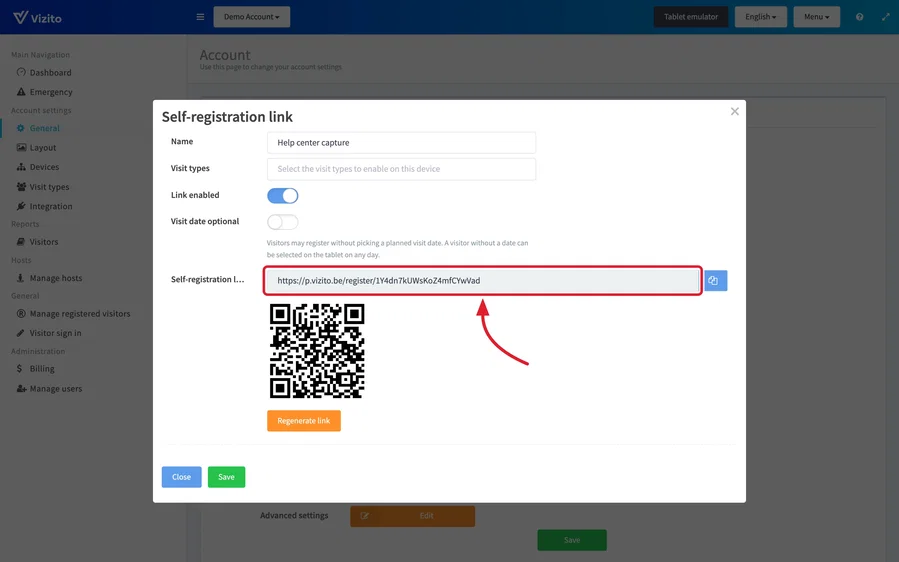
Give the link a “Name”, pick the “Visit types” a visitor may register for (leave it empty to offer all of them) and keep “Link enabled” on.
-
Copy the address from the “Self-registration link” field with the copy button, or save the QR code shown under it for a poster or a badge.
-
Click “Save”.
The link is not personal, and it does not sign anyone in. It only creates registered visitors, so switch “Registered visitor” on for the visit types you allow: see Registered visitors. Switch “Link enabled” off to pause a link, click “Regenerate link” to replace the address with a new one (the old one stops working at once), or “Delete” it in the list. Visitors already registered through it stay.
An invitation is the personal version of that: you add the visitor, click “Invite”, and the email carries their own pre-registration link and their own QR code. See Invitations and Pre-registration.
Sign in at the tablet by scanning
The QR code of a registered visitor, from the invitation email, from the wallet pass or downloaded in bulk, is scanned at the tablet itself, with the QR button on the welcome screen. It signs the visitor in, and signs them out again on the way out. It needs “QR code sign in” switched on under “Account settings” > “General”. See QR-code signin.
Which one should I use?
- Visitors should not touch the tablet: the contactless QR code on the tablet.
- Visitors arrive where there is no tablet: a static QR code.
- People register themselves for an event or a course: the self-registration link.
- You know who is coming and want them pre-registered: invitations.
- Regular visitors and contractors who come back often: their registered visitor QR code, or a badge with it printed on: see Sign out by scanning the badge.