Badge designer
In this article
The badge designer lets you build a visitor badge by placing text, visitor details, a photo, a QR code and your logo on a label shown at its real size. Every visit type prints its own badge, and several visit types can share one.
A badge can also be an HTML template, which you edit in a text editor with placeholders for the visitor’s details. That route is covered at the bottom of this article, under HTML editor.
Start a badge
-
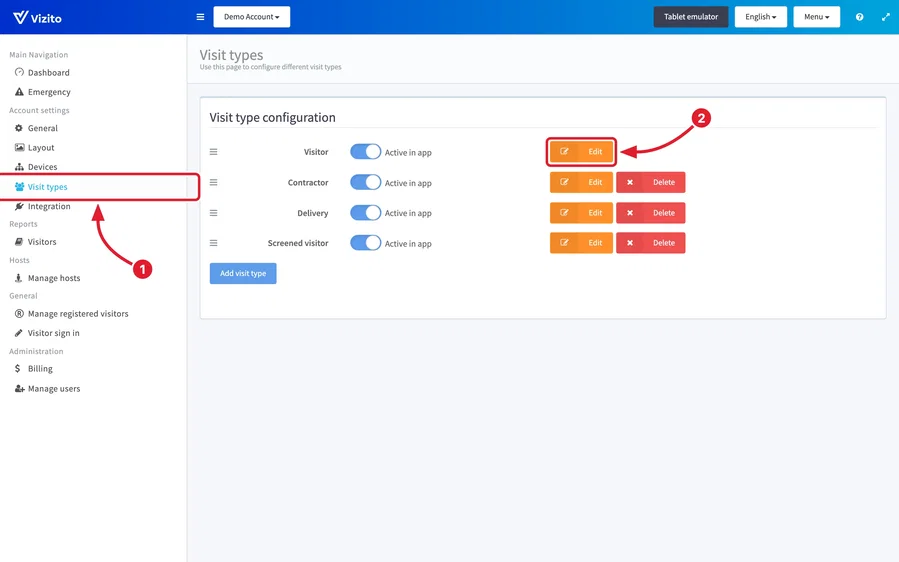
Go to the Vizito backoffice and select “Account settings” > “Visit types” in the left menu.
-
Click “Edit” next to the visit type you want a badge for, then open the “Badge” tab.
-
Under “Badge”, click “Choose a template” to start from a ready-made design, or “Design from scratch” to start from an empty badge. To print a badge another visit type already has, see Reuse a badge on another visit type.
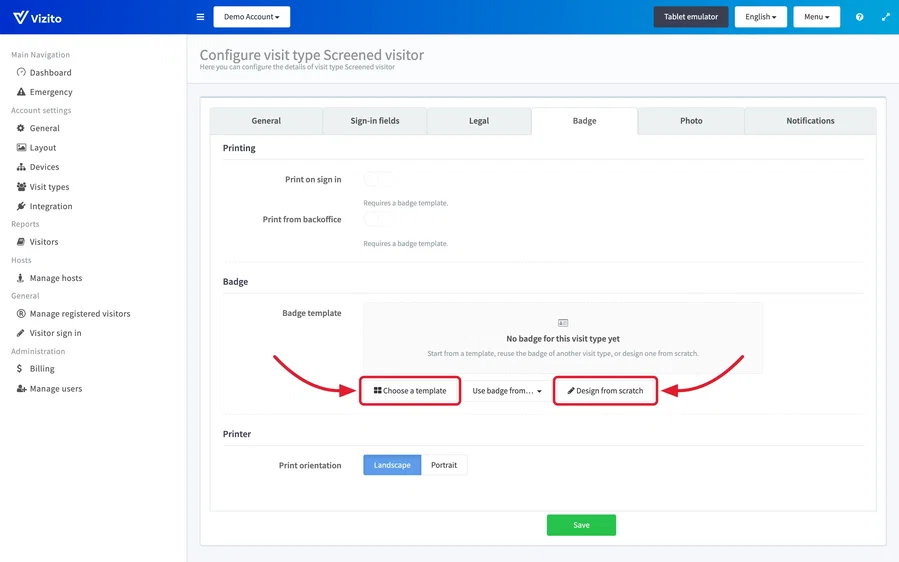
Until the visit type has a badge, the two switches under “Printing” are locked and read “Requires a badge template.”
-
If you chose a template, first select the roll loaded in your printer under “Label roll”: the gallery only lists the templates made for that roll. Then click a template, or “Blank” for an empty badge.
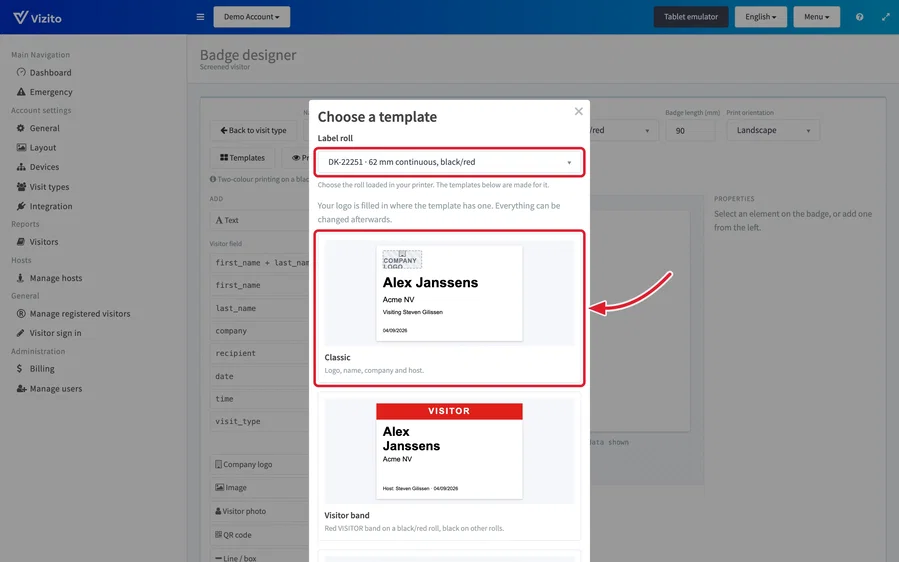
The 54 mm non-adhesive roll (DK-N55224) has a template of its own, “Card”, sized for a badge holder.
The designer opens. Where a template has a logo, your company logo is already filled in.
Design the badge
The designer lists the elements you can add on the left, shows the badge in the middle with sample visitor data, and shows the “Properties” of the selected element on the right.
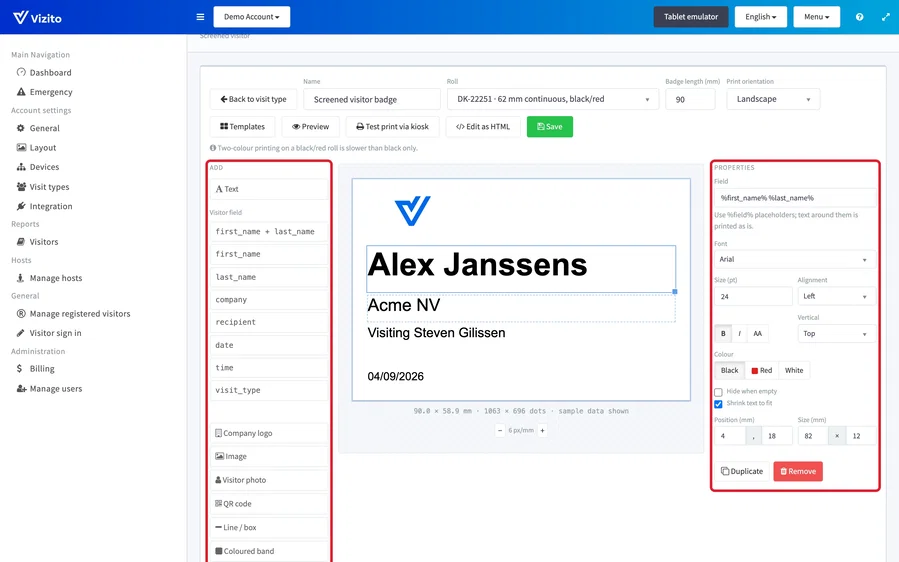
- Click an element on the left to add it to the badge:
- Text for fixed text, such as “Visitor” or the name of your site.
- The entries under Visitor field for details that change per visitor: the name, the company, the host (“recipient”), the sign-in date and time, and the visit type. When this visit type asks for other sign-in fields, such as a phone number, they are listed under Custom fields.
- Company logo for the logo you uploaded under “Account settings” > “Layout”. The button stays greyed out until there is one; see Settings.
- Image to upload another picture, Visitor photo for the photo taken at sign in, QR code, Line / box and Coloured band.
- Drag an element to move it, and drag the small handle at its bottom-right corner to resize it. With an element selected, the arrow keys move it 1 mm, 5 mm with Shift held down, and Delete removes it.
- Change the selected element under “Properties”: “Font”, “Size (pt)”,
“Alignment”, bold, italic, capitals and “Colour”. To place it exactly, type
the numbers under “Position (mm)” and “Size (mm)”. “Duplicate” copies the
element and “Remove” deletes it.
- Hide when empty leaves a visitor field off the badge when the visitor left it blank.
- Shrink text to fit prints a long name smaller instead of cutting it off.
- For a visitor field, “Field” holds its placeholder, such as
%company%. Text you type around it prints as it is, soVisiting %recipient%prints “Visiting” followed by the host’s name. The placeholders are listed under Add placeholders. - For a picture, “Image fit” chooses between “Fit inside” and “Fill and crop”, and “Replace image” swaps the picture.
Note: a badge holds one QR code, so the “QR code” button is greyed out once the badge has one. The code it adds lets a registered visitor sign out by scanning the badge. The other settings this needs are in Sign out by scanning the badge.
Note: red prints only on the black/red roll (DK-22251). On any other roll it prints black.
Choose the roll and the badge size
-
Under “Roll” in the toolbar, select the label roll your printer uses:
- DK-22251, 62 mm continuous, black/red
- DK-22205, 62 mm continuous, white
- DK-N55224, 54 mm continuous, white, non-adhesive
-
Set “Badge length (mm)”, the length the printer cuts off the roll for each badge.
-
Set “Print orientation” to “Landscape” or “Portrait”.
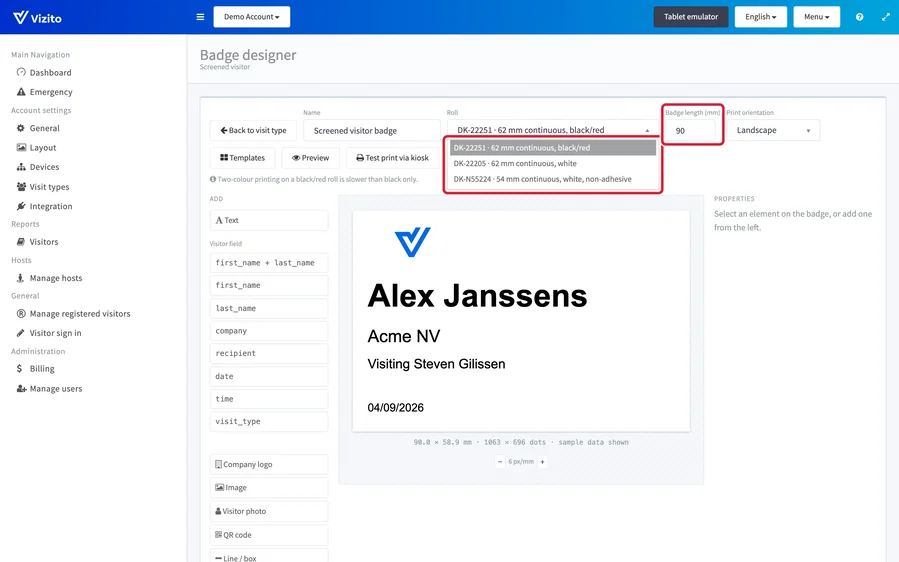
Rolls of the same width share one design: a badge made on one 62 mm roll also prints on the other. When you switch to a roll of another width, the designer scales the elements to the new width and asks you to check the layout and the badge length.
For which roll to buy, see Compatible labels.
Preview and save
-
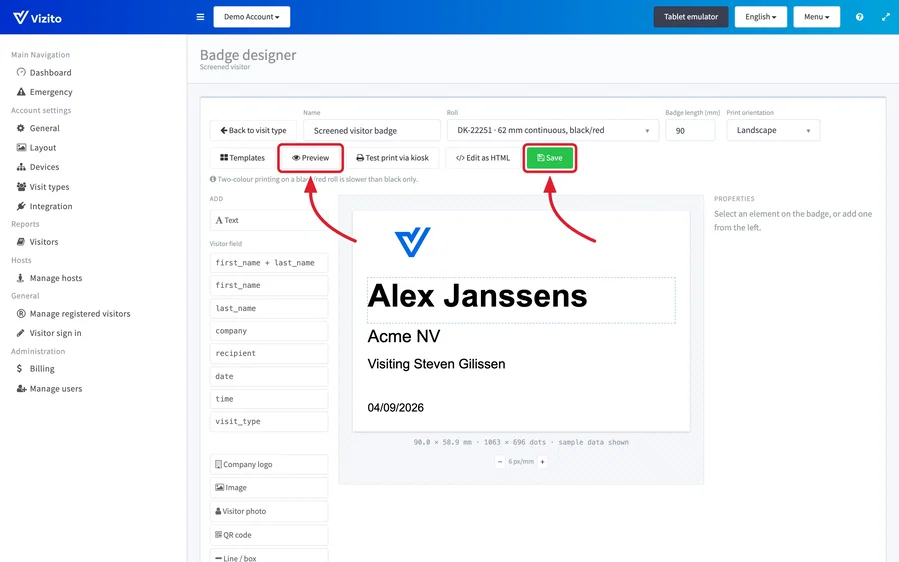
Click “Preview” in the toolbar.
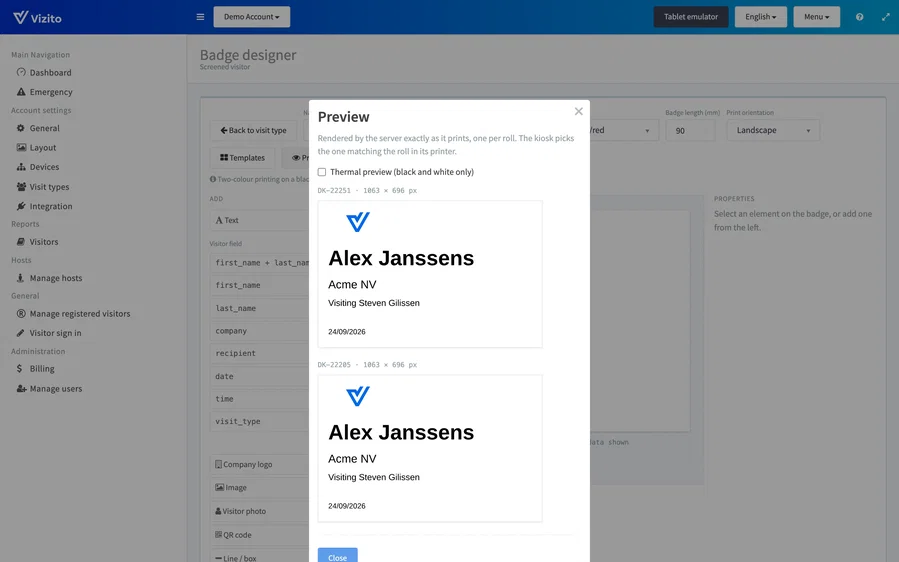
The preview shows the badge exactly as it prints, once for each roll it prints on. Tick “Thermal preview (black and white only)” to see it without colour. Click “Close” to go back to the designer.
-
Check the “Name” at the top of the designer: it is how the badge appears on the “Badge” tab and under “Use badge from…” on other visit types.
-
Click “Save”. The designer stores the badge and takes you back to the “Badge” tab.
Note: “Back to visit type” leaves the designer without saving, and first asks “Discard unsaved changes?” if you changed anything.
Switch printing on and test the badge
-
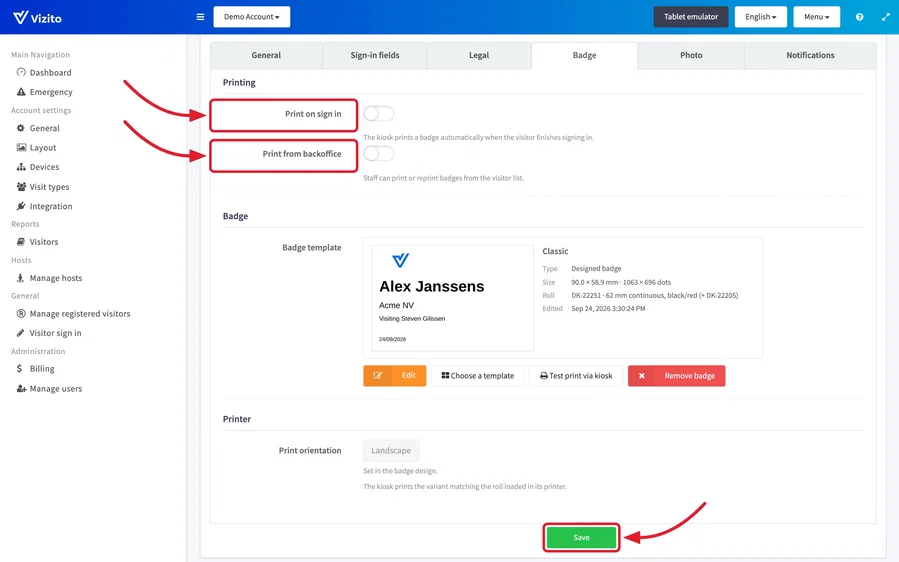
Back on the “Badge” tab, the card shows the badge as it prints and, under “Roll”, the rolls it prints on. Under “Printing”, turn on “Print on sign in”, “Print from backoffice” or both, then click “Save” at the bottom of the tab.
- Print on sign in prints the badge as soon as a visitor finishes signing in at the kiosk.
- Print from backoffice lets staff print and reprint badges from the backoffice; see Reprint label. You also need this when you sign visitors in through Visitor sign in.
-
Click “Test print via kiosk” to print the badge with sample visitor data on a kiosk that has a printer. A message names the printer the badge went to. If no kiosk has a printer yet, the tab says “No kiosk with a printer found. Pair a printer in the Vizito app on the tablet first.”; see Enable badge printing.
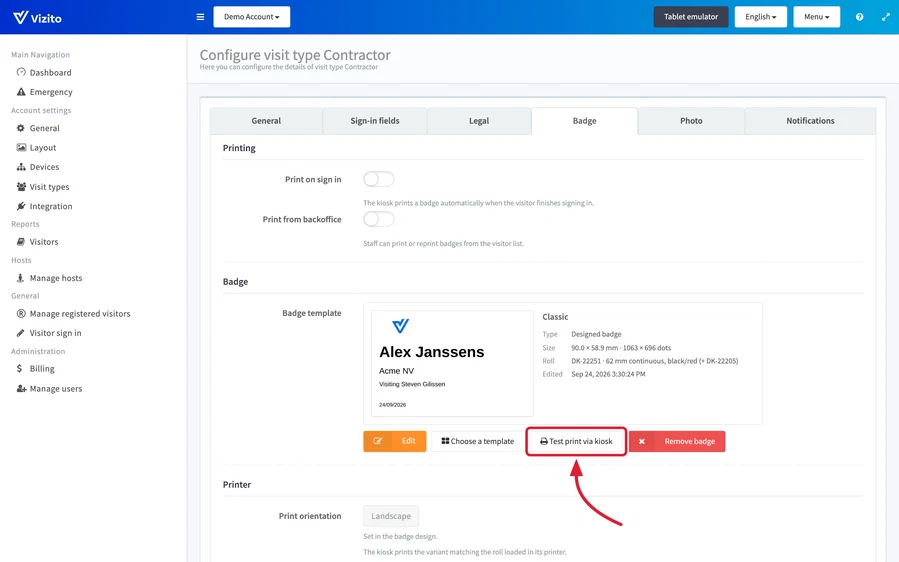
The kiosk prints the version of the badge that matches the roll loaded in its printer, so load one of the rolls the card lists under “Roll”. A designed badge carries its own orientation: “Print orientation” under “Printer” reads “Set in the badge design.”
Note: “Test print via kiosk” is also in the designer toolbar. There it saves the badge first, before it prints.
Change a badge
- Edit opens the badge in the designer. A badge whose “Type” on the card reads “HTML template” opens in the HTML editor instead; see HTML editor.
- Choose a template opens the template gallery over the current badge. Picking a template replaces the design once you save; “Close” keeps the badge as it was. “Templates” in the designer toolbar does the same.
Reuse a badge on another visit type
-
Open the “Badge” tab of the visit type that should print the same badge.
-
Click “Use badge from…” and pick the badge. Each entry names the visit types that print it. The change is saved straight away.
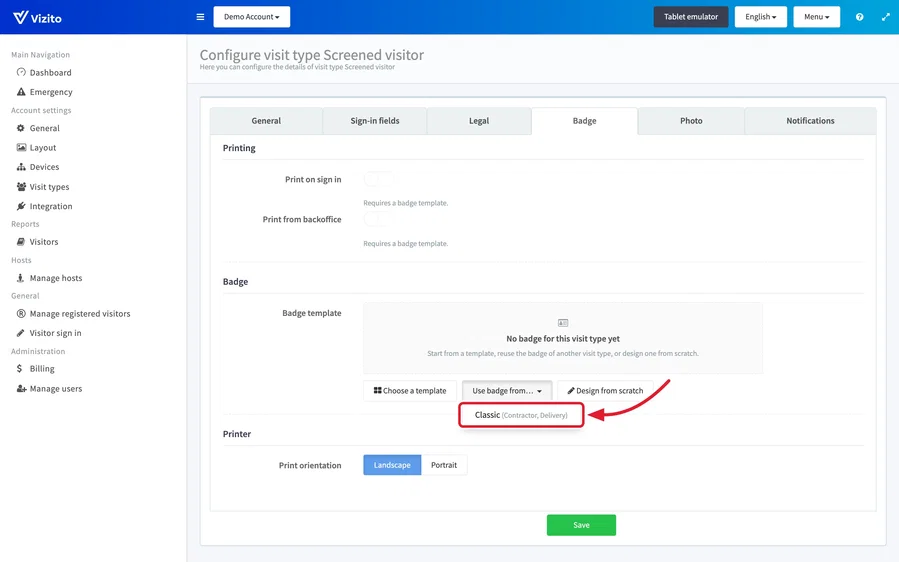
Both visit types now print the same badge, so a change to it shows on both. “Use badge from…” only appears once another visit type has a badge.
Note: on a badge that several visit types share, “Choose a template” and “Save” change the badge for all of them. To give one visit type a badge of its own, click “Remove badge” first, then start a new one. For an HTML template you can also copy the design into a separate badge; see Copy an HTML design to another visit type.
Remove a badge
“Remove badge” stops the visit type printing its badge and is saved straight away. The badge itself stays with any other visit type that prints it. A badge that no other visit type prints is gone: it is no longer offered under “Use badge from…”.
Sign out by scanning the badge
The most useful thing to print on a badge is a code the visitor scans to sign out, and to sign in again on their next visit. Four settings make it work:
- Open “Account settings” > “Visit types”, click “Edit” on the visit type, and on the “General” tab open “Advanced settings”. Switch on “Automatically create registered visitors” and click “Save”. Every visitor of this visit type now becomes a registered visitor at sign in, which is what gives them a code of their own. See Advanced settings.
- Put the code on the badge. In the designer, click “QR code” and save the
badge. In an HTML template, open the HTML editor,
type
%qrcode-known_visitor_id%where the code should print and click “Save” in the editor. Either way, give it room: a code smaller than about 20 mm is hard for the tablet camera to read. - Under “Account settings” > “General”, switch on “QR code sign in” and click “Save”. This puts the QR button on the welcome screen of the tablet. See QR-code signin.
- Leave “Field used for registered visitors QR lookup feature” in the advanced settings at its default. The code on the badge carries Vizito’s own identifier, and that setting decides which field a scanned code is matched against.
On the way out the visitor taps the QR button on the tablet and holds the badge in front of the camera: they are signed out. On their next visit the same badge signs them in, and if “Skip the sign in page” is on for the visit type, without touching the form. Visitors who signed in before you switched step 1 on have no code yet; their next sign in creates one.
HTML editor
A badge is either a designed badge, which you build in the designer above, or an HTML template, which you edit in a text editor with placeholders for the visitor’s details. Use the HTML editor for a layout the designer cannot make, or for a badge whose card on the “Badge” tab already reads “HTML template”.
Open the HTML editor
How you reach the editor depends on the card next to “Badge template” on the “Badge” tab.
The card reads “HTML template”
Click “Edit”, the first button under the card. The HTML editor opens.
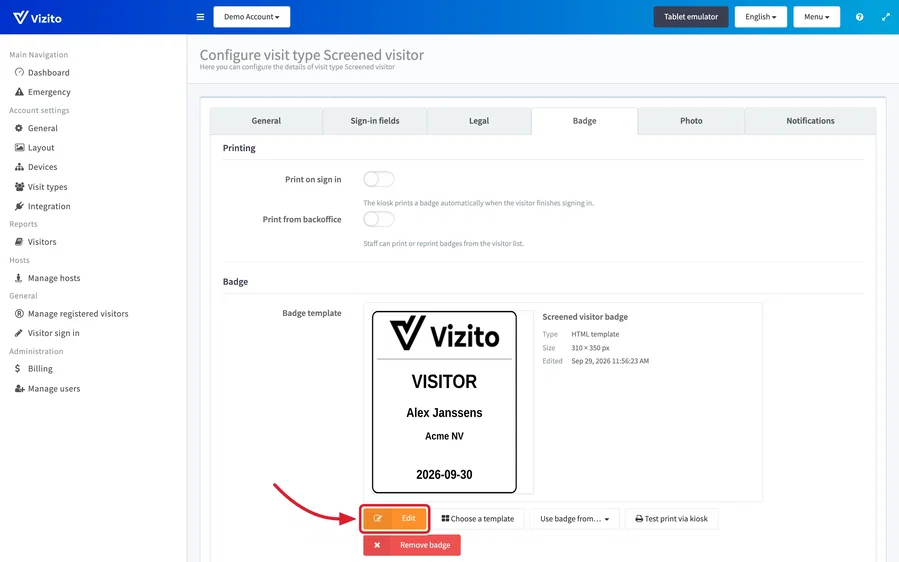
The card reads “Designed badge”, or there is no badge yet
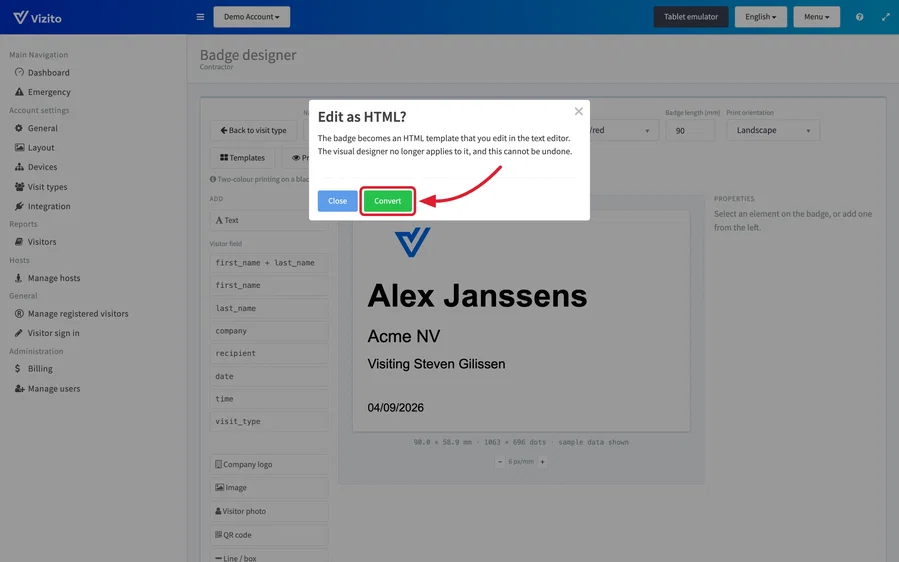
“Edit” on a designed badge opens the badge designer, not the HTML editor. To edit the badge as HTML, convert it first:
-
Open the badge designer. For a designed badge, click “Edit”. If the tab says “No badge for this visit type yet”, click “Design from scratch”, or “Choose a template” and pick a template; see Start a badge.
-
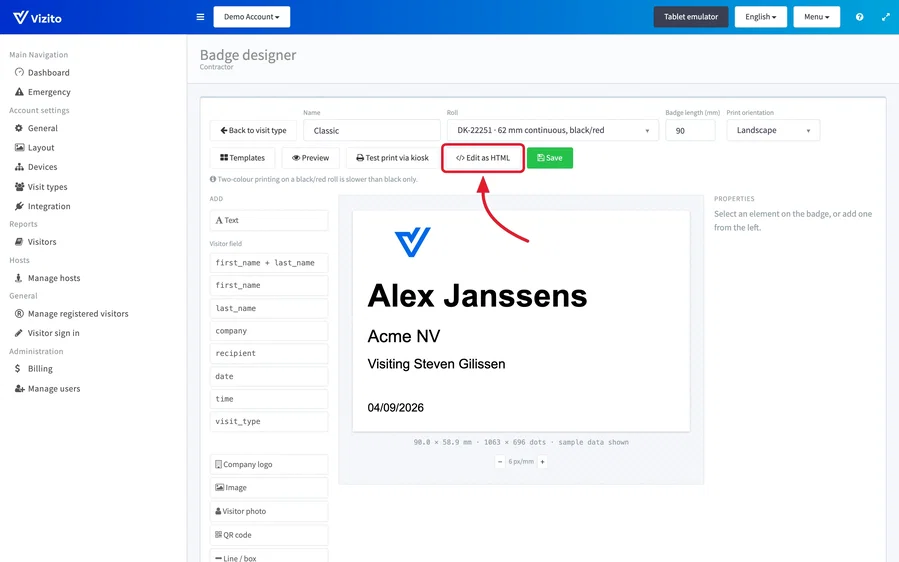
Click “Edit as HTML” in the designer toolbar.
-
Click “Convert” in the “Edit as HTML?” window. The badge becomes an HTML template with the layout it had in the designer, and you are back on the “Badge” tab.
-
Click “Edit” under the card. It now opens the HTML editor.
-
Set the print orientation yourself, as described in Set the print orientation. It is no longer taken from the design.
Note: converting cannot be undone. The designer no longer opens for this badge; to design it visually again, start over with “Choose a template”, whose gallery also offers “Blank”. If other visit types print the same badge, it becomes an HTML template for all of them.
Edit the badge template
-
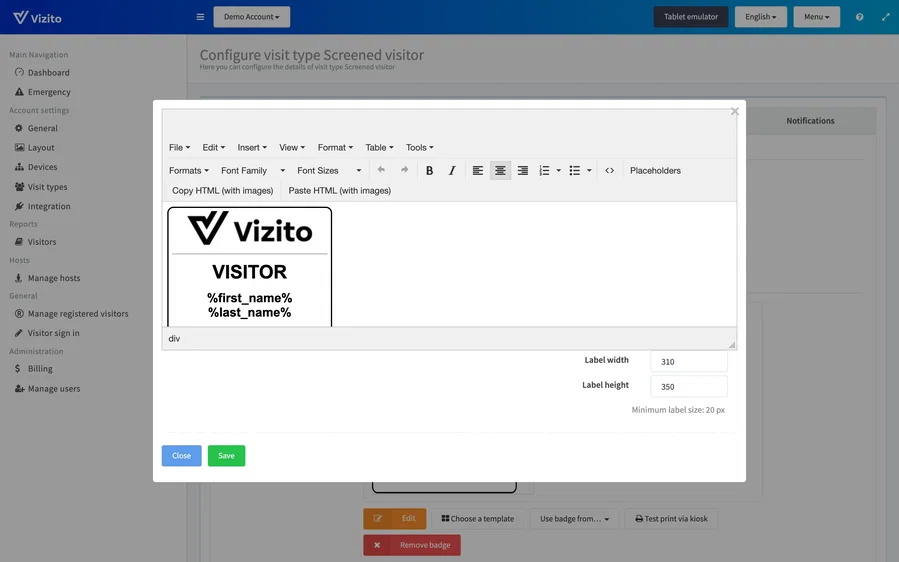
Change the badge in the editor: type over the text, restyle it with the toolbar, and use placeholders for anything that differs per visitor.
-
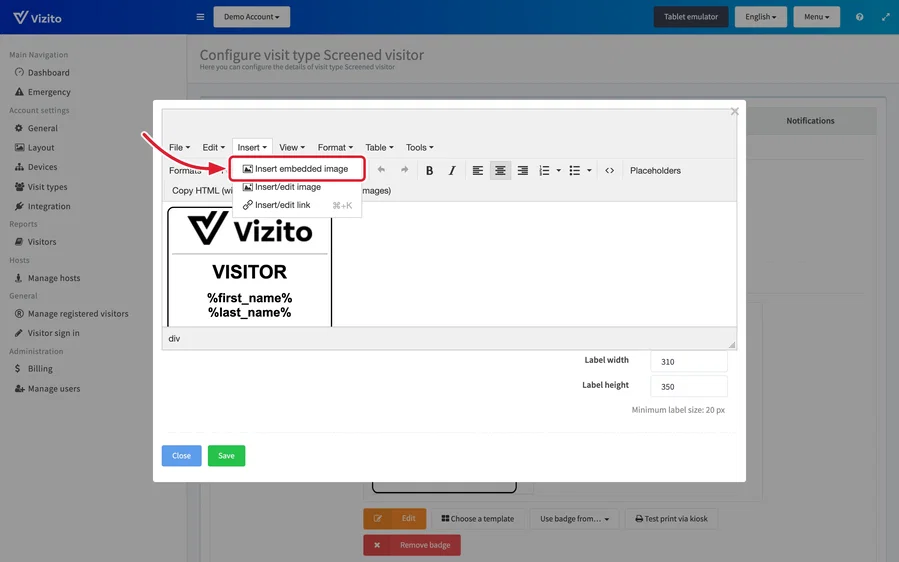
To add your logo or another picture, choose “Insert” > “Insert embedded image” and pick your image file. To replace a picture that is already on the badge, select it and delete it first.
-
Set “Label width” and “Label height” under the editor to the size of the label you print on. Both are in pixels and the smallest accepted value is 20 px.
-
Click “Save” in the editor. The editor closes and the card on the “Badge” tab shows the new badge.
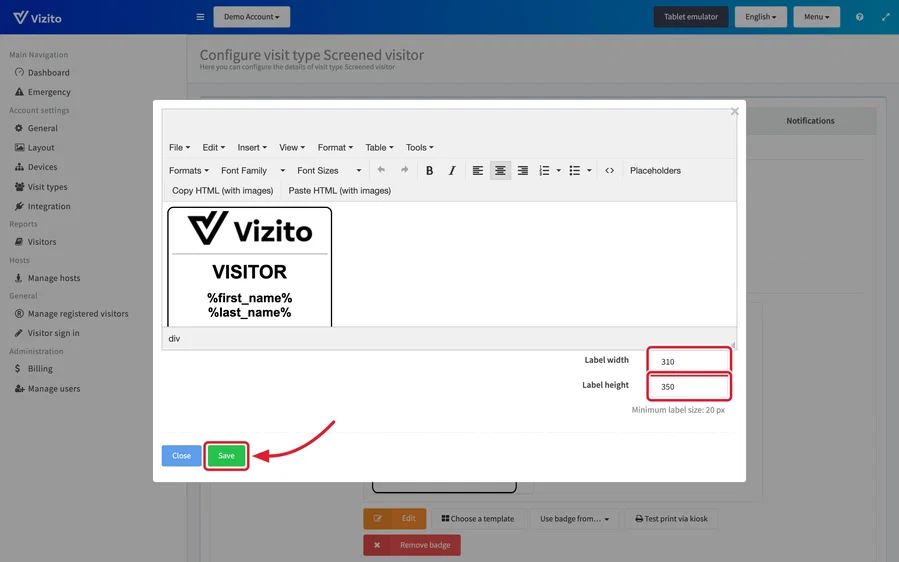
Note: “Close” leaves the editor without saving, and everything you changed since you opened it is lost. “Save” at the bottom of the “Badge” tab does not store the template either: it only stores the print switches and the orientation.
Note: a badge that prints cut off, stretched or half-empty is usually a size problem rather than a design problem. Check “Label width” and “Label height” against your actual label, and check “Print orientation” on the “Badge” tab, before you start changing the template itself. See Compatible labels for the label stock we test with.
Set the print orientation
An HTML template takes its orientation from the “Badge” tab, not from the design.
-
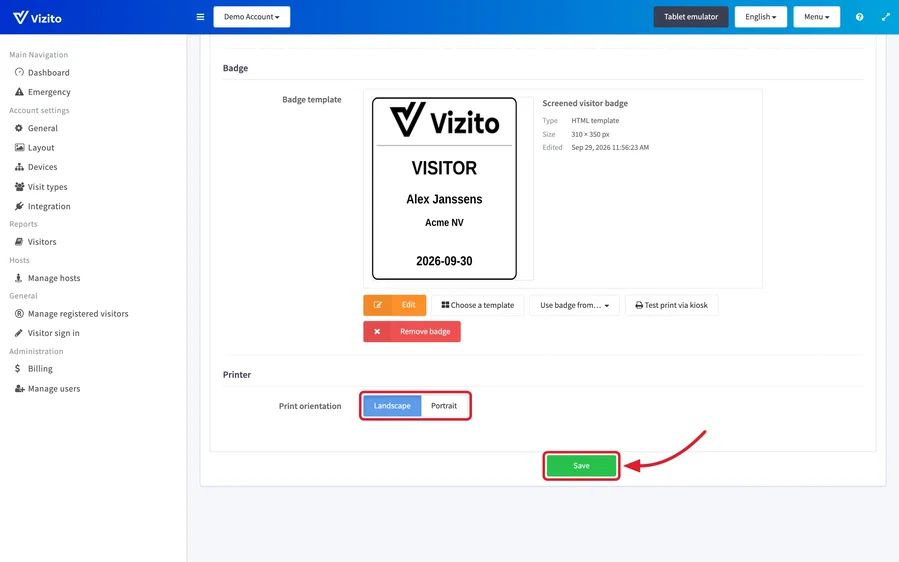
On the “Badge” tab, scroll down to “Printer” and set “Print orientation” by clicking “Landscape” or “Portrait”, matching the way your labels come out of the printer.
-
Click “Save” at the bottom of the tab. The orientation, like the print switches, only takes effect once you have saved.
Add placeholders
A placeholder is replaced with the visitor’s own details at the moment the
badge prints, so %first_name% on the template becomes the name of whoever is
signing in.
-
Click in the template where you want the value to appear.
-
Click “Placeholders” on the formatting toolbar, to the right of the
<>source code icon.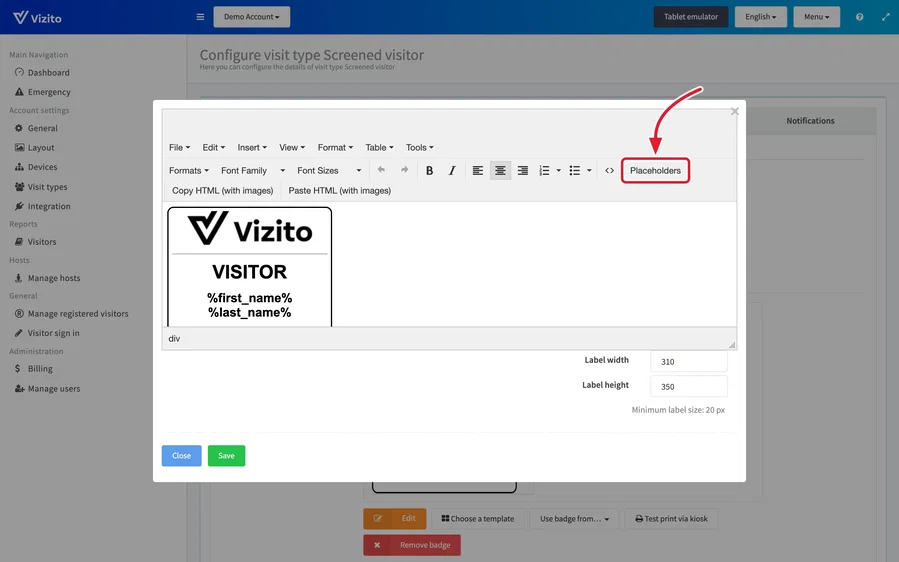
-
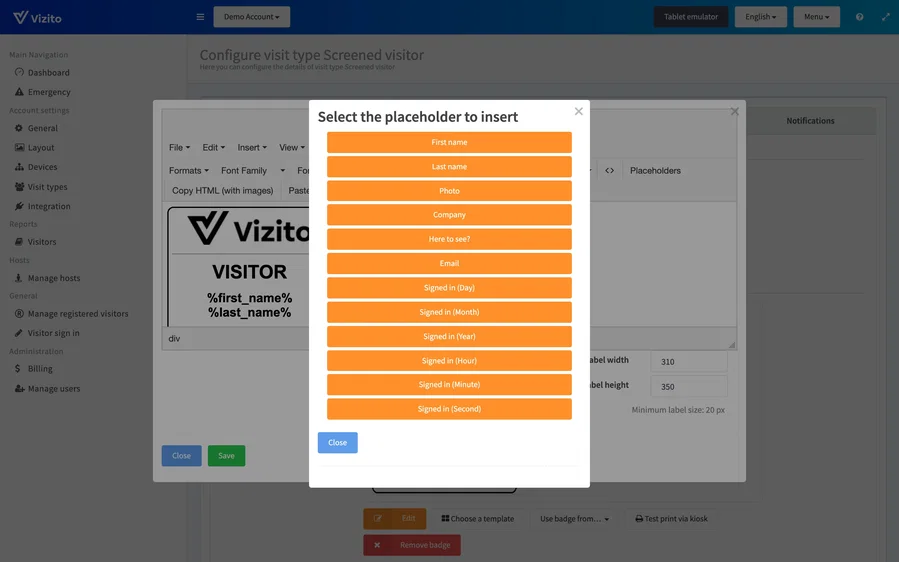
Click the placeholder you need. The picker closes and the placeholder is inserted where your cursor was. Repeat this for every placeholder you want to add.
-
Click “Save” in the editor when you are done.
The picker lists the sign-in fields that are switched on for this visit type, followed by the parts of the sign-in date and time. With the standard fields it offers:
| Placeholder | Inserts |
|---|---|
| First name | %first_name% |
| Last name | %last_name% |
| Photo | <img src="%photo%" style="height: 200px;"> |
| Company | %company% |
| Here to see? | %recipient% |
%email% |
|
| Signed in (Day) | %signed_in_day% |
| Signed in (Month) | %signed_in_month% |
| Signed in (Year) | %signed_in_year% |
| Signed in (Hour) | %signed_in_hour% |
| Signed in (Minute) | %signed_in_minute% |
| Signed in (Second) | %signed_in_second% |
Fields you added to the visit type yourself on the “Sign-in fields” tab, such as a phone number, are in the picker as well. A field that is switched off is not.
“Photo” inserts the visitor photo as an image 200 pixels high. Change the
height value to print it larger or smaller. “Photo” is only in the picker if
the visit type takes a photo, which you switch on under the “Photo” tab.
Text between curly brackets { } disappears from the badge when the
placeholder inside it is empty, so a visitor who leaves out their company does
not get a stray label printed.
QR codes
QR codes are not in the picker; you type them. Use %qrcode-value% and replace
“value” with what the code should contain:
%qrcode-vizito.eu%prints a QR code for a fixed value, here a link to a website.%qrcode-recipient%prints a QR code containing the host being visited.%qrcode-known_visitor_id%prints a QR code for the registered visitor, which they can scan to sign out again; see Sign out by scanning the badge.
Copy an HTML design to another visit type
Use this when the second visit type starts from the same design but will be changed on its own. To print one and the same badge instead, use Reuse a badge on another visit type. Both visit types need an HTML template of their own. The buttons sit on the bottom row of the editor toolbar.
- Open the HTML editor of the visit type whose design you want, click “Copy HTML (with images)”, then click “Close”.
- Open the HTML editor of the other visit type and click “Paste HTML (with images)”. It replaces everything in the editor.
- Set “Label width” and “Label height”, which are not copied along, then click “Save” in the editor.
Edit the source code
For a design the editor toolbar cannot produce, edit the HTML of the badge directly.
-
Click the
<>icon on the formatting toolbar.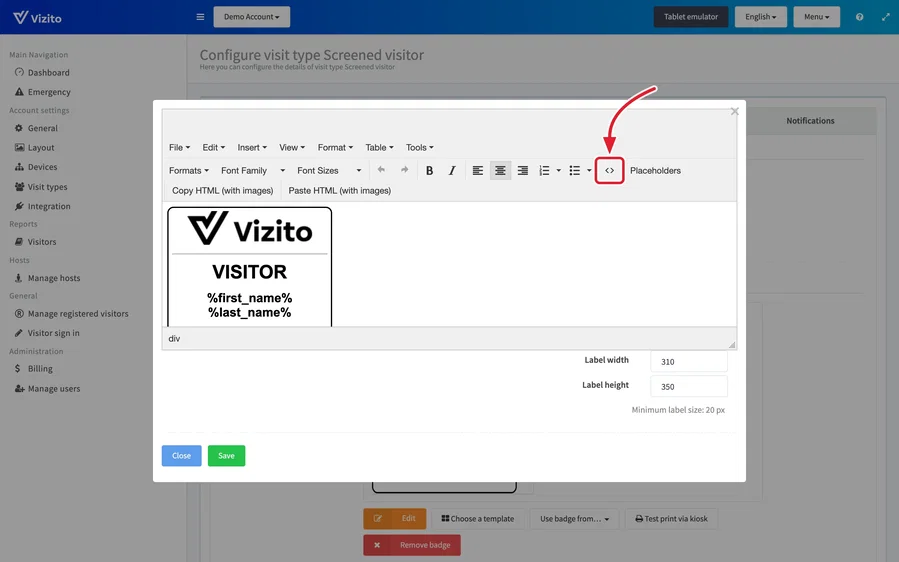
-
Edit the HTML in the “Source code” window and click “Ok”. You are back in the editor.
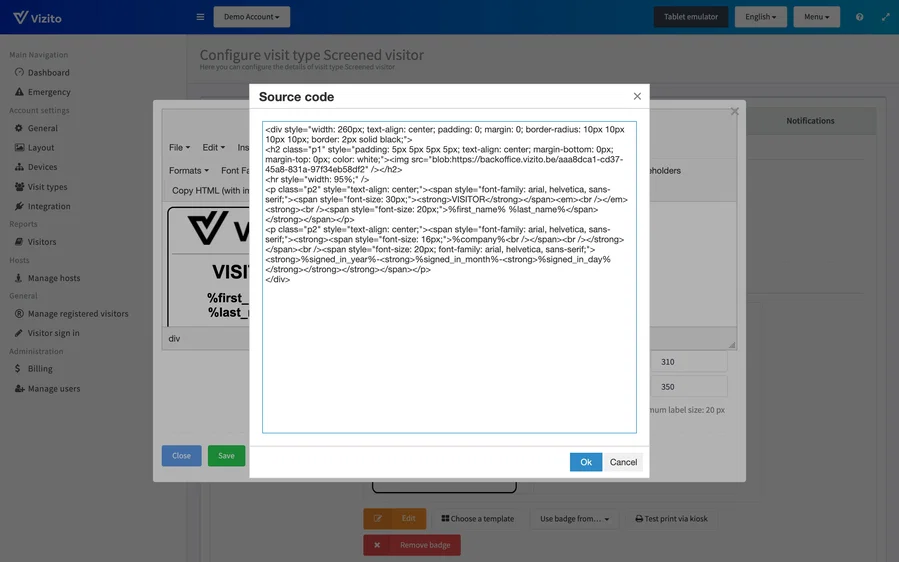
-
Click “Save” in the editor.
Note: nothing is stored until you click “Save” in the editor. “Ok” only takes the source code back into the editor, and “Close” in the editor throws your changes away.