Brother QL-820NWBc setup
The Brother QL-820NWBc is the label printer we recommend most often for a Vizito reception desk. It speaks both WiFi and Bluetooth, it has a small screen so you can change settings without plugging it into a computer, and it can be locked with a PIN so nobody at the desk changes it by accident.
The QL-820NWBc replaces the QL-820NWB, which Brother no longer sells. Vizito supports both, and the steps below are the same for either model.
This guide takes the printer from the box to a badge that prints by itself the moment a visitor signs in. It covers the printer side (loading, network, Bluetooth, PIN) and the Vizito side (switching badge printing on and selecting the printer on the tablet).
If you have not bought a printer yet, start with Compatible labelprinters. Once badges are printing, Badge designer covers the design itself.
Before you start
You need:
- The printer, its AC adapter and power cord.
- One DK roll. For visitor badges the usual choice is DK-22205 continuous 2.4" (62 mm) adhesive tape, cut to length by the printer. DK-11202 die-cut labels also work. See Compatible labels for non-adhesive rolls and badge holders.
- A tablet that is already connected to your Vizito account. If it is not, do that first: Device activation.
- A decision about how the printer will reach the tablet, WiFi or Bluetooth. Both are covered below.
Prerequisite: the printer prints from the tablet next to it, not from the Vizito servers. Printer and tablet have to be able to reach each other, either on the same network or over a Bluetooth pairing.
The buttons you will use
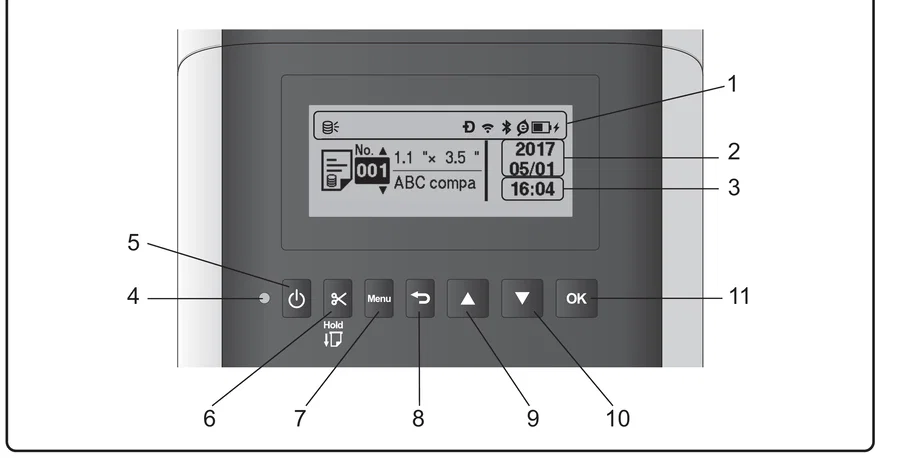
- Indicator display
- Date display
- Time display
- Status LED
- Power button
- Cutter button
- Menu button
- Cancel button
- Up arrow
- Down arrow
- OK button
Everything in this guide is done with Menu, the two arrows and OK. Cancel steps back one level, and pressing it several times returns you to the main screen. Printer menu names in this guide are the English ones. If you set the printer to another language, the wording on the screen changes but the order of the menus does not.
Unpack and load the printer
1. Remove the protective sheet
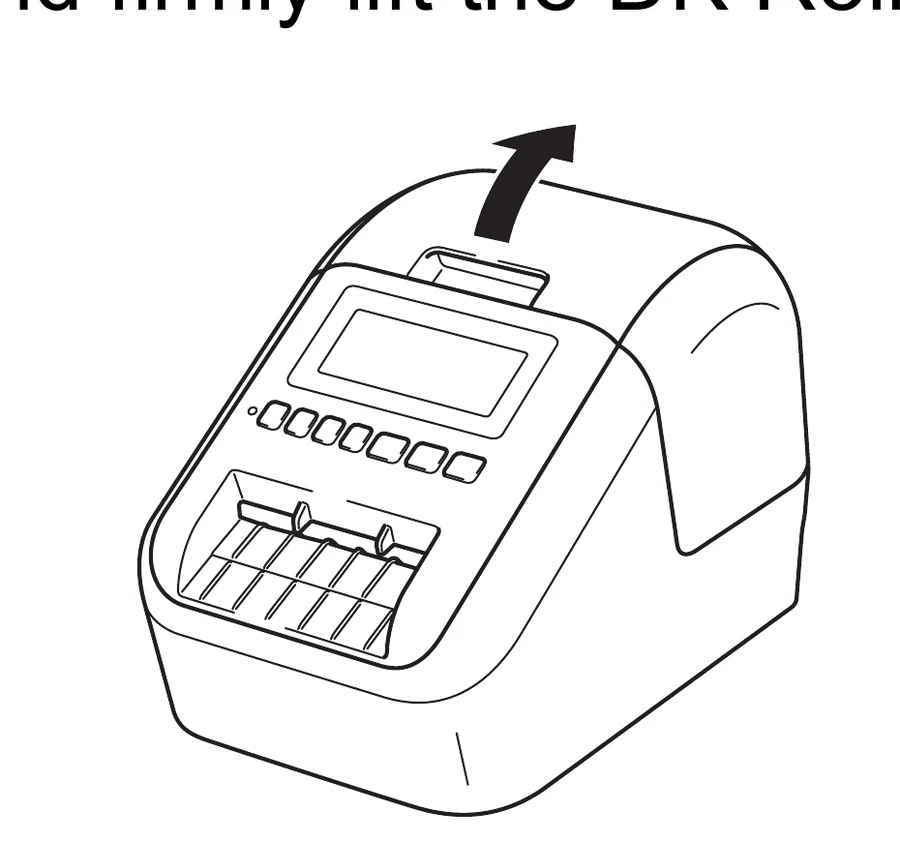
Make sure the printer is off, hold it by the front and lift the DK roll compartment cover. Pull the protective sheet out of the label output slot.
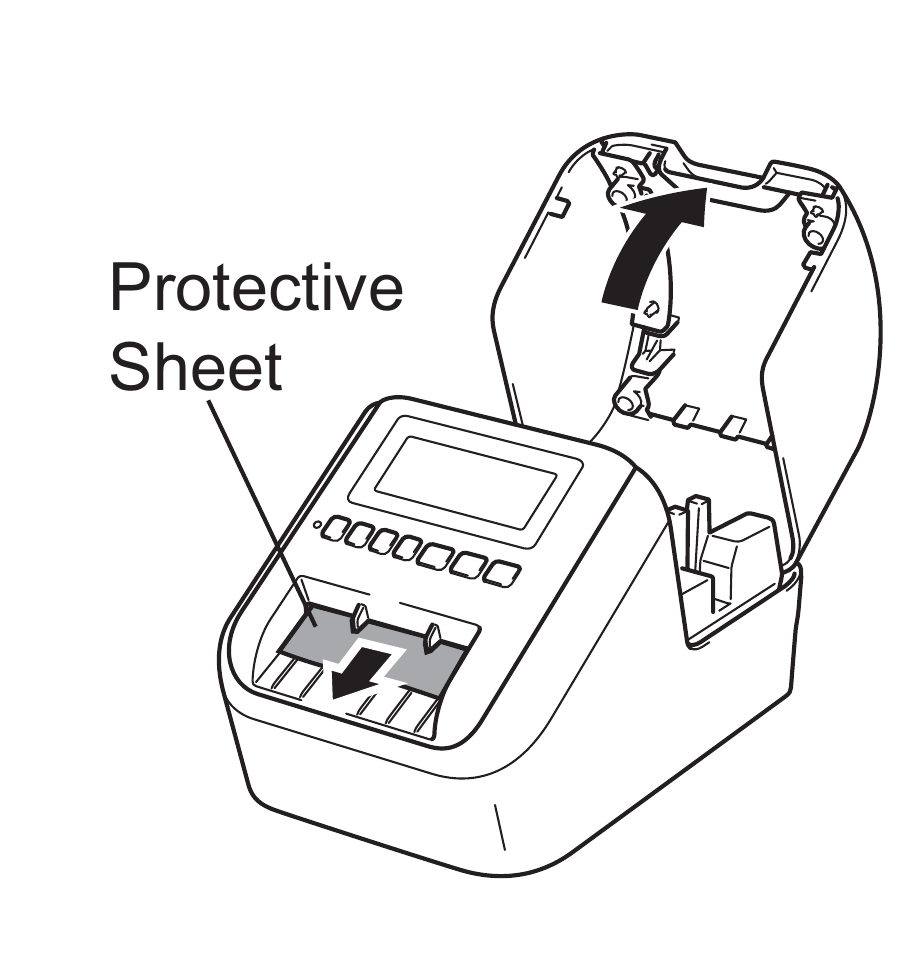
Keep the sheet. If the printer is going to stand unused for a long time, Brother recommends taking the roll out and putting the sheet back in to protect print quality. A kiosk printer in daily use stays loaded.
2. Free the clock battery
Under the same cover sits a preinstalled coin cell that keeps the date and time while the printer is unplugged. It ships with an insulation seal. Pull the seal out now, otherwise the clock resets every time the printer loses power and printed timestamps drift. Brother recommends replacing this battery every two years; a clock that resets while the printer is on mains power is the sign that it is due.
3. Connect the power
Plug the AC adapter into the printer, connect the power cord and plug it into a grounded outlet.
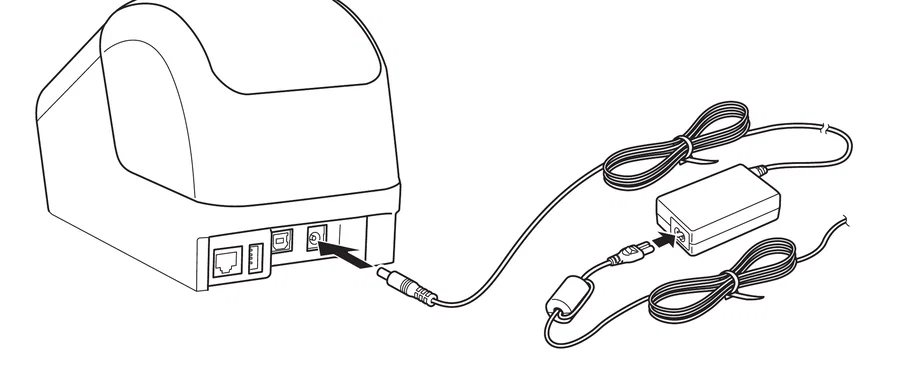
The ports on the back are, from right to left:
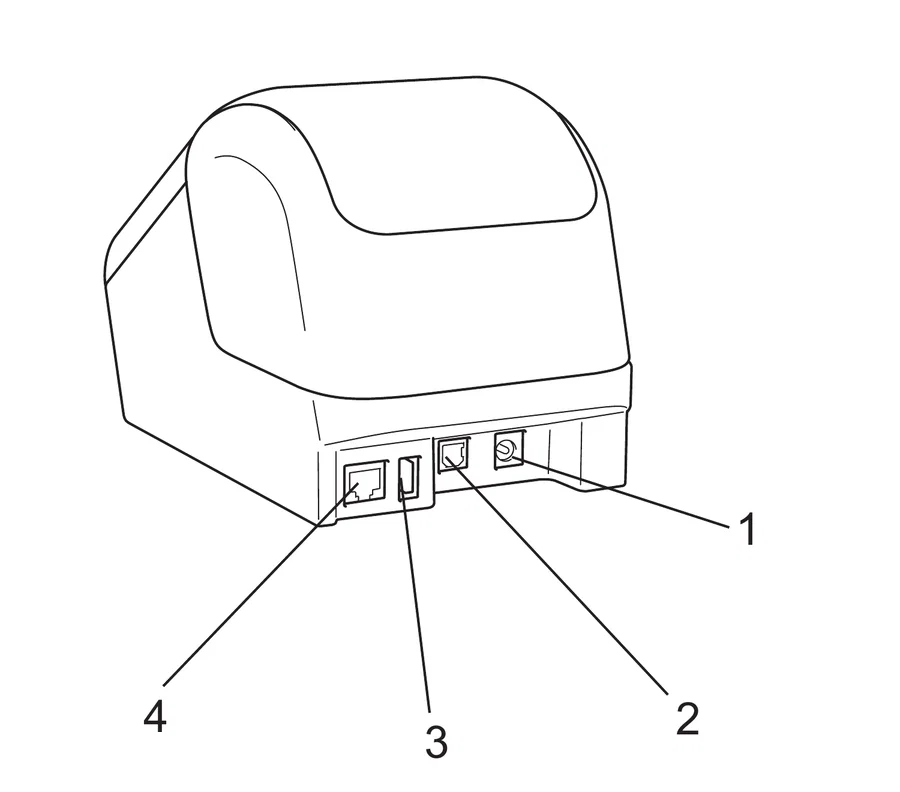
- AC adapter port
- USB port
- USB host, for an optional barcode scanner (QL-820NWB only, the QL-820NWBc does not have it)
- LAN port
Note: the QL-820NWBc also has a wired LAN port, and the printer will not use it while wireless LAN is switched on. Vizito is tested on WiFi and Bluetooth, so those are the two routes described here. If your network team would rather run the printer on Ethernet, contact us first.
4. Load the DK roll
Lift the DK roll compartment cover.
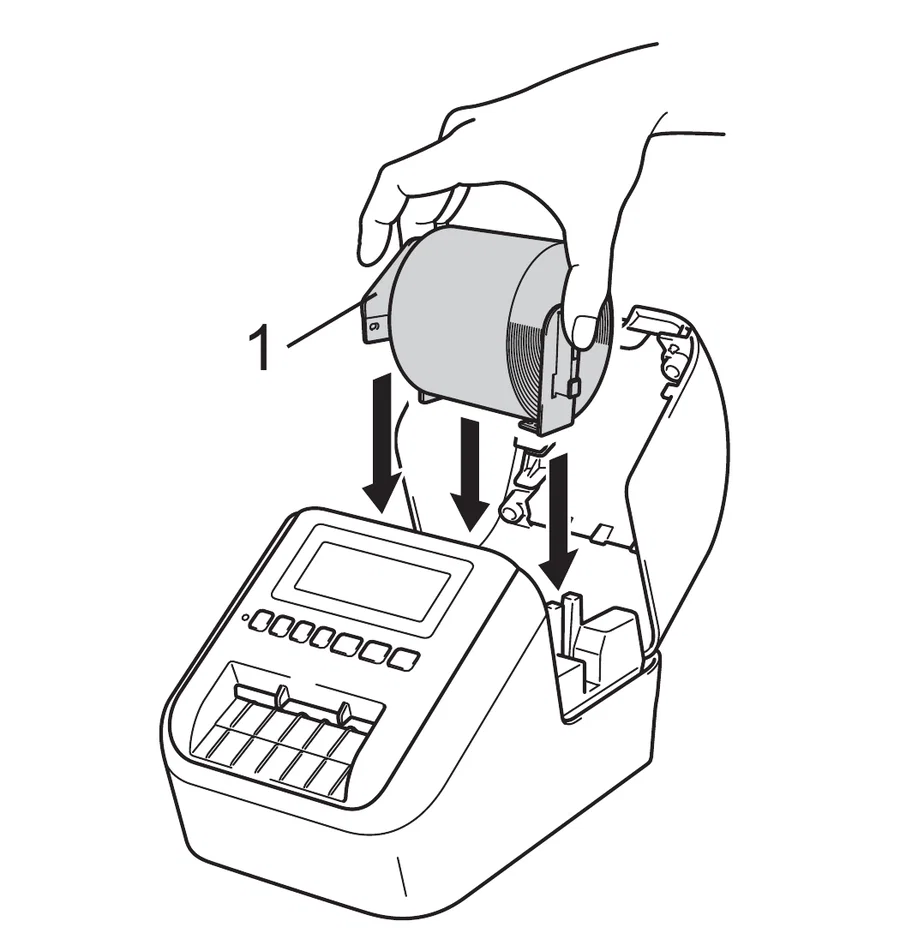
Put the roll into the roll spool guide. Check that the roll spool arm sits firmly in the guide and that the stabiliser slides into the notch in the printer.
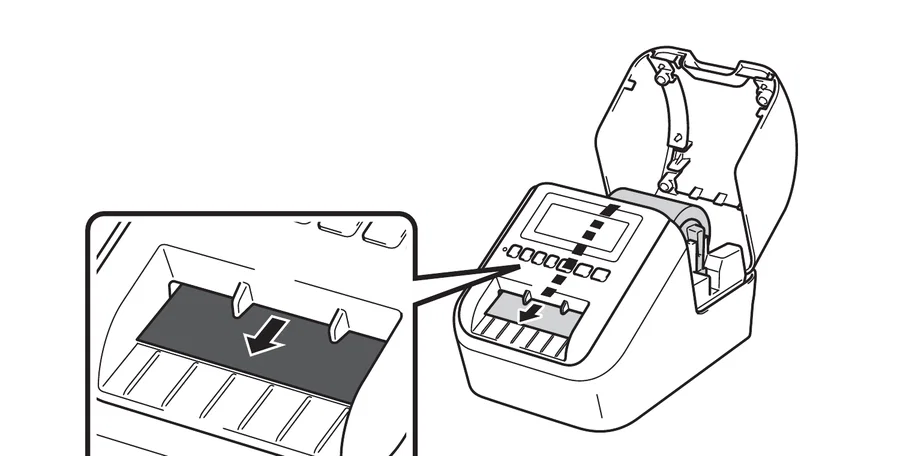
Thread the roll through the printer: align its edge with the upright edge of the label output slot, feed the first label into the slot inside the compartment and push it through until the end reaches the mark.
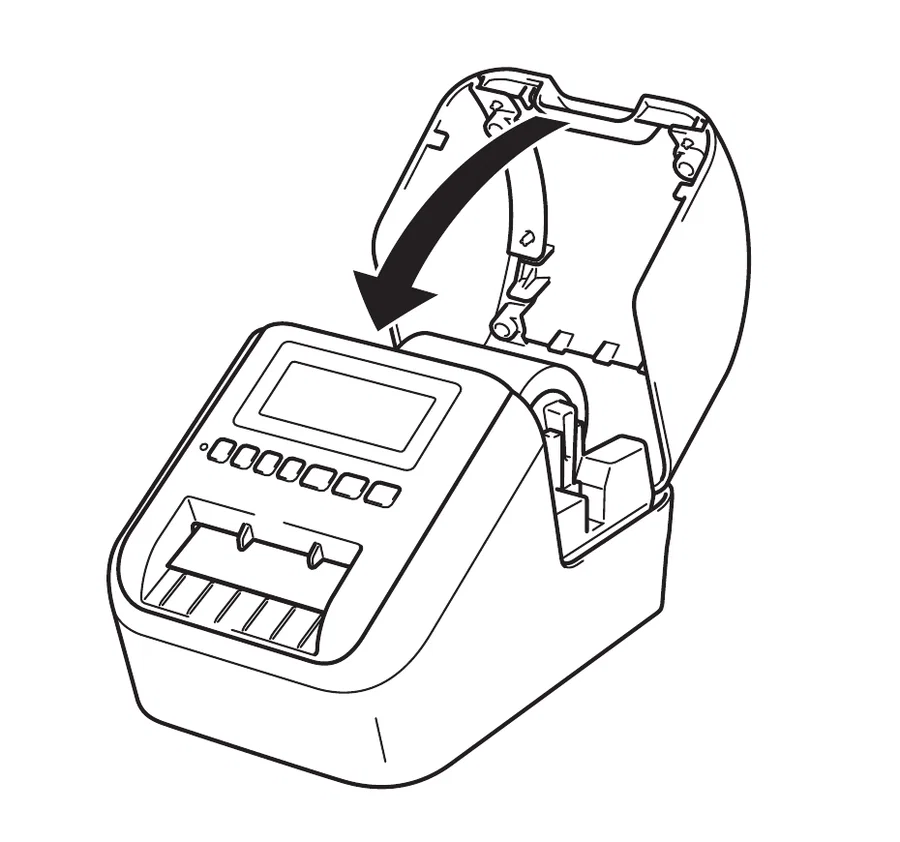
Close the cover. When you switch the printer on it aligns the end of the roll by itself.
Important: do not leave printed labels sitting in the printer. At a reception desk this is the most common cause of a jam, because a badge nobody picks up is still in the slot when the next visitor signs in.
5. Switch on, then set the language and the clock
Press the power button. The status LED turns green and the main screen appears. The first time it starts, the printer asks for a language straight away.
To change it later: Menu > Administration > Language, then pick your language and press OK.
Now set the clock, so the date and time you see on the printer and in its logs are right:
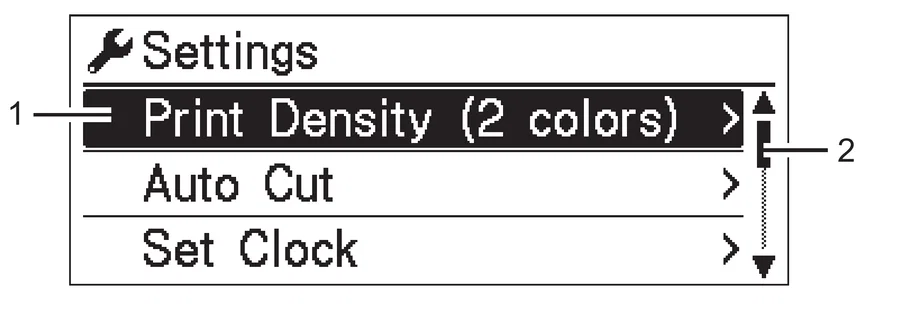
- Press Menu and select Settings, then press OK.
- Select Set Clock and press OK.
- Set the last two digits of the year with the arrows and press OK. Do the same for the month and the day.
- Set the hours and the minutes, then choose AM, PM or 24.
- Press OK.
The date and time format live under Menu > Administration > Date Format and Time Format.
WiFi or Bluetooth?
Both work with Vizito, on iPadOS and on Android.
WiFi is the better choice for a fixed reception desk. The printer sits on the network, the connection survives the tablet being restarted, and several tablets can print to it. It needs a network that lets the printer and the tablet see each other, which some guest networks deliberately do not.
Bluetooth is the better choice when you cannot get the printer onto the network, or for a pop-up reception desk. It needs no router, but it pairs one device at a time and the pairing has to be re-established after either device has been off.
Note: the printer can also act as its own access point, which Brother calls Wireless Direct. Do not use that mode for a Vizito kiosk. A tablet joined to the printer’s own network is no longer on the internet, and the Vizito app needs to reach Vizito to register the visitor in the first place.
Connect the printer over WiFi
-
Press Menu, select WLAN and press OK. Set WLAN (On/Off) to On.
-
Go back into WLAN, select Network Mode and press OK, then choose Infrastructure Mode.
-
Join the network. There are two ways:
- With WPS, if your access point has the WPS symbol: select WPS Button Push, press OK, then press the WPS button on the access point. The printer tries for two minutes.
- By hand: select Infra Manual Setting. The printer lists the networks it can see. Pick yours, press OK and type the password with the arrows and OK.
-
When the connection is made, Connected! appears and the WLAN icon shows in the status bar at the top of the screen.
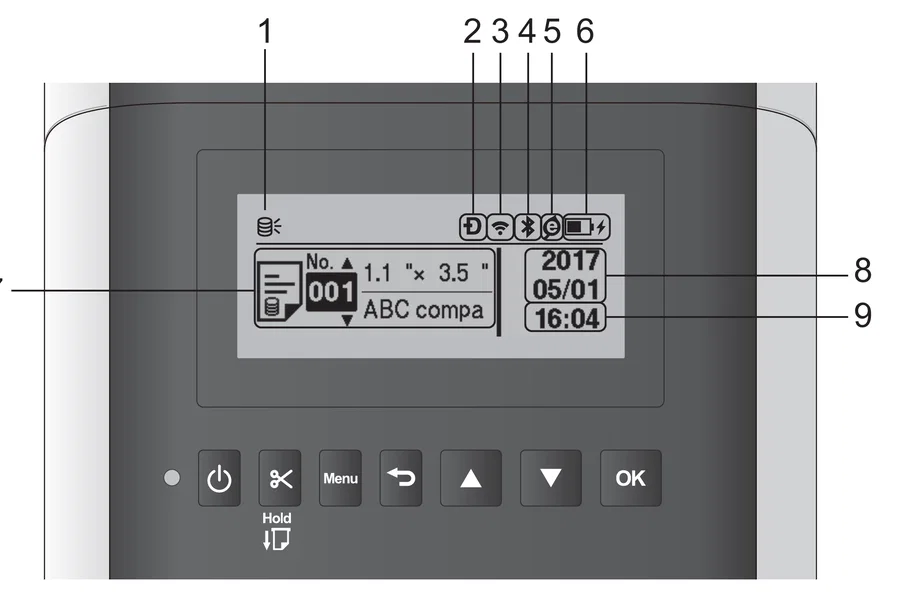
The icons across the top are, from left to right: update, Wireless Direct, WLAN, Bluetooth, eco charging and battery level. The last two only appear when the optional battery unit is fitted. A WLAN icon that cycles through its bars means the printer is still searching for the network.
-
Note the printer’s address, in case you ever need it: Menu > WLAN > WLAN Status > Infrastructure Mode shows the status, the SSID, the IP address, the node name, the subnet, the gateway and the MAC address.
Tip: ask whoever runs your network to give the printer a fixed address, either a static one on the printer or a DHCP reservation. A printer that changes address after a power cut is a printer the tablet has to be pointed at again.
Note: if you need to start the network setup over, or you are moving the printer to another site, clear it first with Menu > Administration > Reset > Network Reset. That resets the communication settings only and leaves your other printer settings alone.
Now go to Turn badge printing on in Vizito.
Connect the printer over Bluetooth
-
Put the printer next to the tablet and switch it on.
-
Press Menu, select Bluetooth and press OK. Set Bluetooth (On/Off) to On. The Bluetooth icon appears in the status bar.
-
Still in the Bluetooth menu, set Automatic Reconnection to On. On an iPad this is what lets the printer come back by itself after either device has been off, so switch it on before you pair.
-
On the tablet, open the Bluetooth settings, find the printer in the list and pair with it. The printer’s own name is under Menu > Bluetooth > Bluetooth Status, next to Device.
-
If the tablet asks you to confirm a pass key, the same key shows on the printer screen. Press OK on the printer to accept it.
Then continue with Turn badge printing on in Vizito.
Keeping the Bluetooth connection alive
Bluetooth is the part of this setup that people come back to us about, so it is worth knowing how it behaves:
- The pairing survives a power cycle, the connection does not. The printer remembers what it is paired with when it is switched off. The live connection still drops whenever the printer or the tablet is turned off, and the tablet has to reconnect before the next badge can print.
- Automatic Reconnection only covers Apple devices. Menu > Bluetooth > Automatic Reconnection reconnects an iPad, iPhone or iPod touch by itself. On Android there is no equivalent, so after either device has been off, open the Bluetooth settings on the tablet and reconnect the printer.
- One device at a time. Once a device is connected, the printer stays connected to it until it is turned off and will refuse everything else. A pairing error almost always means another tablet, phone or laptop still holds the printer. Turn that device off, or disconnect the printer from it, and pair again.
- A flashing Bluetooth icon on the printer screen means Automatic Reconnection is on and the printer is not connected yet.
- Distance and obstacles matter. Keep the printer within a few metres of the tablet, and out from behind metal furniture. Microwave ovens, cordless phones and busy WiFi in the same room all interfere.
If the connection keeps dropping at a desk that never moves, move the printer onto WiFi instead.
Next: switch badge printing on in Vizito
The printer is only half of the setup. Nothing comes out of it until badge printing is switched on for the visit type the visitor signs in with, and the kiosk has been told which printer to use.
Both steps are in Enable badge printing. Come back to the checklist at the end of this article if the badge still does not appear.
Lock the printer with a PIN
A label printer on a reception desk sits within reach of everyone who walks past it, and its whole configuration is three button presses away. Two settings put that out of reach.
Set a menu password
- Press Menu, select Administration and press OK.
- Select Menu Security, set it to On and press OK.
- Set the first digit with the arrows and press OK to move to the next. Do the same for the remaining three digits.
From now on the printer asks for those four digits whenever somebody opens the Administration menu.
To remove the password later, open Administration, enter the password, then set Menu Security to Off.
Important: write the PIN down somewhere your colleagues can find it. If it is lost, the only way back in is to reset the printer to its factory settings from a computer with Brother’s Printer Setting Tool, which also clears the network settings you just made.
Lock the menus you do not want touched
Menu > Administration > Menu Locks lets you tick the individual menus that may no longer be changed from the printer itself: Settings, Template Settings, Information, WLAN, Bluetooth, Feed and Remote Update. Select the ones you want locked, then choose Finish. A locked menu shows a padlock next to it.
For a kiosk printer, locking WLAN and Bluetooth is usually enough: the network settings are the ones that turn an idle press of the Menu button into a printer nobody can print to.
Settings worth checking for a reception desk
- Auto Cut (Menu > Settings > Auto Cut). Auto Cut cuts every badge, which is what you want when visitors take their own badge from the printer. Cut at End only cuts after the last label of a job.
- Auto Power Off (Menu > Settings > Auto Power Off > Adapter). Set this to Off for a printer that has to answer at any moment. It is ignored anyway while a WiFi, wired or Bluetooth connection is up, but the explicit Off setting saves confusion.
- Print Density (Menu > Settings > Print Density). Raise it if the print looks pale, lower it if solid areas smear.
- Backlight Timeout (Menu > Settings > Backlight). Shortening it stops the printer screen glowing at the desk all day.
Label size, roll type and orientation
Three settings decide what comes out of the printer: the roll, the size of the badge and its orientation. Nearly every badge that prints wrong comes down to one of them.
Where you set the size and the orientation depends on the kind of badge. In the Vizito backoffice, go to “Account settings” > “Visit types”, click “Edit” next to the visit type and open the “Badge” tab. The card under “Badge” shows the “Type” of the badge: “Designed badge” for a badge made in the badge designer, or “HTML template” for a badge edited as HTML. “Edit” on that tab opens the designer for the first and the HTML editor for the second.
| Setting | Where | What it does |
|---|---|---|
| Roll type | On the printer itself | Which DK roll is loaded. The tablet reads it from the printer and the backoffice shows it under “Account settings” > “Devices” > “Printers” as “Loaded label roll”. Swap the roll and the next reading follows. On an Android tablet the “Edit” button of the printer opens “Printer settings” with a “Label type” field, but the tablet overwrites it with what it reads from the printer. |
| Badge size, designed badge | “Roll” and “Badge length (mm)” in the toolbar of the badge designer | The roll sets the width of the label, and “Badge length (mm)” is the length the printer cuts off the roll for each badge. |
| Badge size, HTML template | “Label width” and “Label height” under the HTML editor | The size of the badge Vizito draws, in pixels. Their ratio decides how long the printed label is on a continuous roll. |
| “Print orientation” | Designed badge: in the toolbar of the badge designer. On the “Badge” tab it is shown under “Printer” with the note “Set in the badge design.” and cannot be changed there. HTML template: the “Landscape” and “Portrait” buttons under “Printer” on the “Badge” tab, followed by “Save” | “Portrait” or “Landscape”: whether the width or the height of the badge runs along the roll. |
Continuous or die-cut? DK-22205 (62 mm) and DK-22251 (62 mm, black and red) are continuous rolls: the printer cuts each badge to the length of your template. DK-11209 (62 x 29 mm) and the other DK-11xxx rolls are die-cut: every label has a fixed size and the printer cuts at the gap, whatever the template says. Use a continuous roll for badges and check that “Loaded label roll” shows the roll you think is in the printer. “Label roll not recognised” or “No label roll detected” means the printer cannot read the roll: take it out and put it back, and check that it is a genuine DK roll.
Reading the symptoms. An HTML template is scaled so that one side fills the width of the roll, and the other side follows from the ratio of “Label width” to “Label height”. On a 62 mm roll a badge that is much wider than it is high therefore prints short in portrait and long in landscape. A designed badge has no such ratio to get wrong: it takes its size from the roll and the “Badge length (mm)” chosen in the designer.
| Symptom | Likely cause | Fix |
|---|---|---|
| The label is cut short, for instance after 29 mm | HTML template: “Print orientation” is “Portrait” for a wide badge, so the printed length is only the height of the badge. Designed badge: “Badge length (mm)” is too short. Either kind: a die-cut 62 x 29 mm roll is loaded | HTML template: set “Print orientation” to “Landscape”, or make “Label height” larger in relation to “Label width”. Designed badge: raise “Badge length (mm)” in the designer. Either kind: load a continuous roll |
| The badge is stretched, squashed or has empty space on one side | On an HTML template, the ratio of “Label width” to “Label height” does not match the badge you want | Keep the ratio of the printed badge you want, for instance 62 to 90 for a 62 x 90 mm badge, and keep “Print orientation” in step with it |
| The badge prints blank or shows only the logo | The badge is empty, or an image in it is too large for the label | Click “Edit” on the “Badge” tab, check what is in the badge, and click “Save” in the designer or the HTML editor |
| “Wrong label type loaded in the printer” on the tablet | The roll that is loaded is not the one the printer expects | Load the right roll, then tap “Sign In” and “Back” on the tablet so it reads the printer again |
| Nothing prints at all | Connection, roll or visit type | See If nothing prints below |
Deleting the printer is not the fix. The “Printers” section under “Account settings” > “Devices” offers “Clear printer” (and, for an Android tablet, “Edit”). Clearing makes the tablet ask for a printer again at the next sign in, which is how you re-select the printer after it changed network or address, see Enable badge printing, but it changes nothing about the label size or the roll. Those live in the badge, which you open with “Edit” on the “Badge” tab of the visit type, and in the printer.
If nothing prints
Work down this list before contacting us:
- Is the status LED green? Orange usually means the roll compartment cover is open or the print head is cooling down. Red flashing once every two seconds means the printer wants attention: end of roll, a feed error, or no media.
- Is there roll left, and is the cover properly closed?
- Does the printer still hold its connection? Over WiFi, check that the WLAN icon is solid. Over Bluetooth, check that another device has not taken the printer.
- Has the tablet still got the printer selected? Tap “Sign In” and “Back” to refresh the app, and select the printer again if the prompt returns.
- Is badge printing on for this visit type? A badge that prints for one kind of visitor and not another is nearly always this.
- Print the printer’s own settings report. Menu > Information > Print Configuration > All prints the firmware version, the network settings and the printer’s address on a 2.4" (62 mm) roll. It tells you immediately whether the printer thinks it is on your network.
- Nothing at all after a cutter error? Keep the cover closed and press the power button. The cutter returns to its normal position and the printer switches off. Then switch it on, open the cover and remove any jammed label.
If the badge prints but looks wrong, the badge rather than the printer is at fault: see Badge designer for a designed badge and HTML editor for an HTML template.
For the per-platform walkthroughs, see iPadOS badge printing, Android badge printing and browser-based badge printing.
The printer illustrations in this article come from the Brother QL-810W/QL-820NWB User’s Guide.